
2017 BOM: Minimal Day Sampler


January
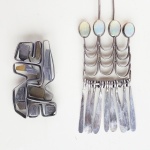
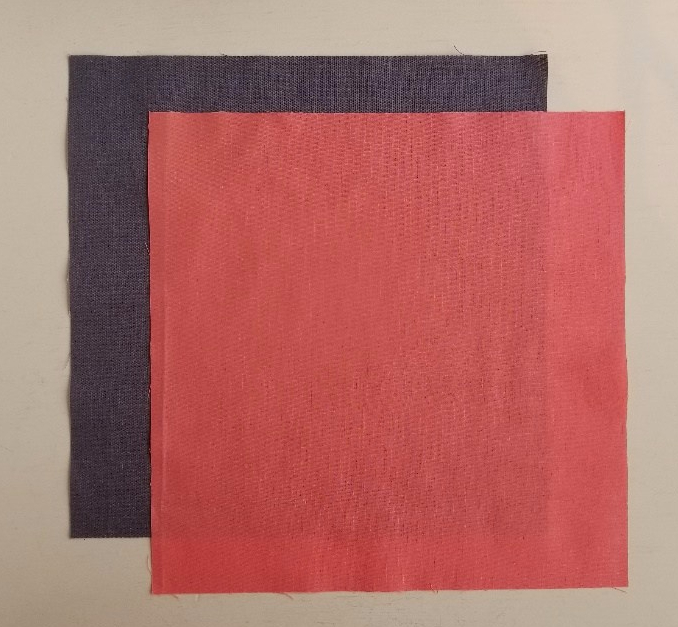
When I was asked to create this year’s block of the month, I might have had a tiny panic attack. Then when the word “applique” came up, I was intrigued. Since I don’t typically work in a modern style, (tiny pink flowers, anyone? No? Just me?) I wasn’t exactly sure where to begin. So after I stopped hyperventilating, I started looking around for inspiration and ideas. At some point in that process, I came across these two pieces in my jewelry box:

They are the marvelous work of my great uncle, Russell Day. He was an art professor at Everett Community College. A designer and jeweler. Entirely obsessed with color and light. And he made some truly amazing things with beautiful and interesting forms. Sounds like the makings of a quilt, right? Right. So here we go.
Knowing that applique may be new, or even terrifying to some of you, I’ve tried to keep it very simple. You are not in for a Baltimore Album here. I promise. It’s a relatively small quilt that incorporates a new applique skill each month. So if you hang in there with me throughout the year, you will learn all the tricks to be able applique absolutely anything you want. (This is where you cheer, clap, happy dance, whatever. Go ahead. I’ll wait…)
Ok. That’s done.
Now, let’s talk about what you’ll need to get started.
Applique Supplies:
- Milliner (or Straw) needles size 10 or 11. I especially like Bohin as they are very fine but have a larger eye. Richard Hemming works well too. The advantage of the milliner needle is the length. It allows you more needle to hold on to while you’re using the rest to sweep your seam allowances under.
- Fine weight thread to match your appliques. Aurifil 50wt works brilliantly, though I have had success with most threads. If you can’t match the color of your applique, go a shade darker or choose a medium neutral, like grey or tan.
- Thread conditioner. Thread Heaven (or something similar) may be helpful depending on the kind of thread you use.
- Applique pins. Glass head pins seem to tangle threads less, but short and fine are the most important things to look for. OR – if you regularly glue baste as you sew, you can use that same washable glue, with a fine tip applicator in place of pins to hold your appliques in place.
- Either a sandpaper board or just a plain old sheet of fine grit from the hardware store. It will hold your fabric securely so you can trace your templates without pulling or puckering the fabric.
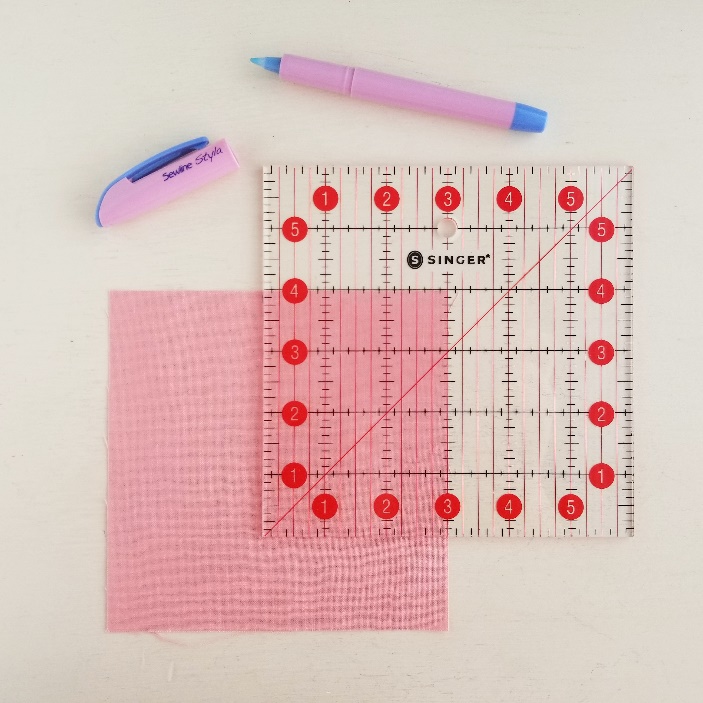
- Marking tool(s). Use your preferred tool here. I will use Frixion pens in this case because the lines get turned under with the seam allowance, so there is no worry over it leaving visible marks on your quilt. I would avoid chalk though, as the marks may disappear too soon from handling your piece as you are stitching.
- Template material. Since we will generally use each template only once, you can use paper or cardstock (or junk mail or whatever) for these. Of course, template plastic will work beautifully too if you have it.
- General sewing supplies. Thimble, scissors for fabric and templates, rotary cutter, mat, sewing machine, etc.
Circa 15 Fabric Studio in Kirkland has all of the supplies I’ve mentioned above. www.circa15fabricstudio.com
Fabric Requirements:
You may choose to make either a 9 block, 30” x 30” wall hanging, or a 12 block, 56” x 69” lap quilt.
- For the wall hanging:
- About 1 yard or a pile of scraps for your appliques*
- 1 yard for block backgrounds
- For the lap quilt:
- About 1 yard or a pile of scraps for your appliques*
- 1 ¼ yards for block backgrounds
- 2/3 yard for sashing
- 1 2/3 yards for borders
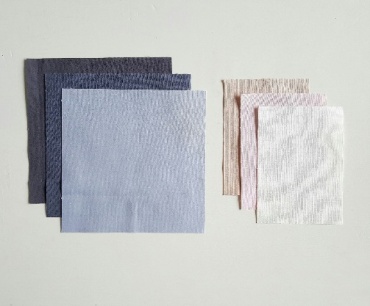
*If you are new to applique, you will likely get the best results with a tightly woven fabric for your applique pieces. Lawns, batiks, fabrics by Art Gallery, and Michael Miller Cotton Couture all work well. (Circa 15 had a nice selection of all of these too.) Avoid anything that has a loose weave, unravels easily, or is heavy or stiff.
If you would like to look ahead to the stitching part, YouTube has a wide array of tutorials (hooray for the internet!) and of course there are lots of books available too. (My favorite for the actual “nuts and bolts” of needle-turn applique is called “Jacobean Rhapsodies” by Patricia B. Campbell and Mimi Ayars. The designs are not modern, but the diagrams and explanations for exactly how to stitch the general types of shapes are excellent. It is out of print, but good, used copies are available on Amazon for around $10.) There are many, many, many methods for doing the applique itself, so if one doesn’t work for you, please try another. I will happily answer any questions you have along the way. You can email me at thebespokeoutlaw@gmail.com or find me on Instagram (@bespokeoutlaw), where I hope to be posting helpful photos and tips each month as well.
For a little extra information about the source of my inspiration and more insight on the style of this project, take a look at this video: https://www.youtube.com/watch?v=l_361S1onRQ.
I hope you are as excited to get started on this as I am!
Jonna Erickson-Outlaw
thebespokeoutlaw@gmail.com
@bespokeoutlaw
February
Minimal Day Sampler – Block One: Quarter Opals
So, after last month’s inspiration and introduction, are you ready to begin sewing? Do you have your supplies ready? Did you choose all you fabrics? Are you dying for me to just hurry up and get on with it? Yeah. Me too. Let’s do this.
This month we will tackle our first block: Quarter Opals.
The shape for this block was inspired by the simple oval shape of the opals in one of the inspiration pieces (see last month’s post for a refresher). It is a smooth, gentle curve, which is a great way to ease into applique.
For this block of the month we will be using needle-turn applique. It is my favorite technique, but like many things in sewing, this particular way of doing things may not suit everyone. So if you try it and are frustrated, or it just doesn’t seem to be working, please ask and I will happily (okay, giddily) help you in any way I can. I love this stuff. Can’t get enough. So really, ask. Please. I’m looking to convert you here. (Cue the maniacal laughter…)
Tip: If you have a preferred method for applique (or if conventional needle-turn just happens to be your own personal kryptonite) please use the method you are most comfortable with. There are a couple of different freezer paper methods or raw-edge applique, which can all deliver excellent results. (Use the gift of the internet and You Tube to look for options to try.)
But anyway, let’s get started.
Cutting:
Because there are two size options for the finished project, the number of pieces will be given for the wall hanging first, followed by those needed for the lap quilt in parenthesis. All photo examples will be for the wall hanging size.
- From background fabric(s): Cut 3 (or 9 for lap size) 5 ½” squares
- From applique fabric(s): Cut 3 (or 9) rectangles 3 ¼” x 4 ½”
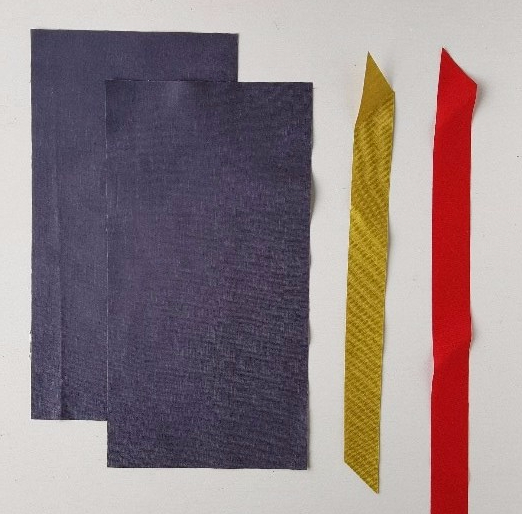
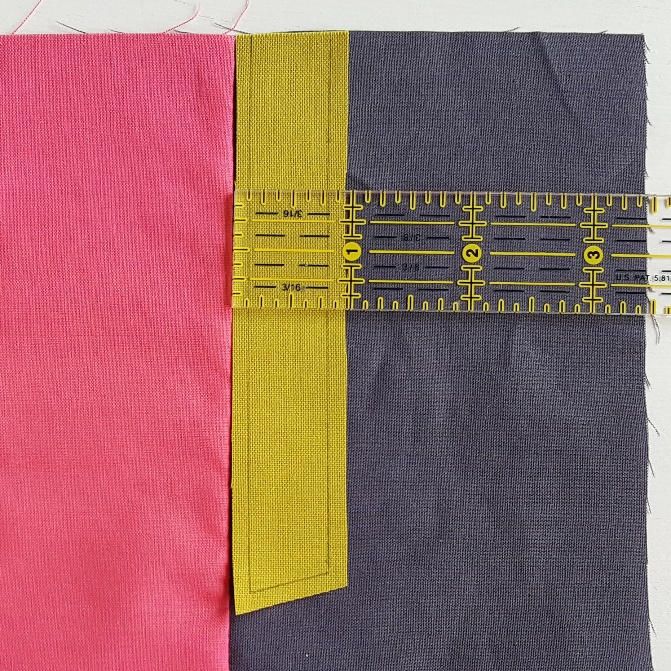
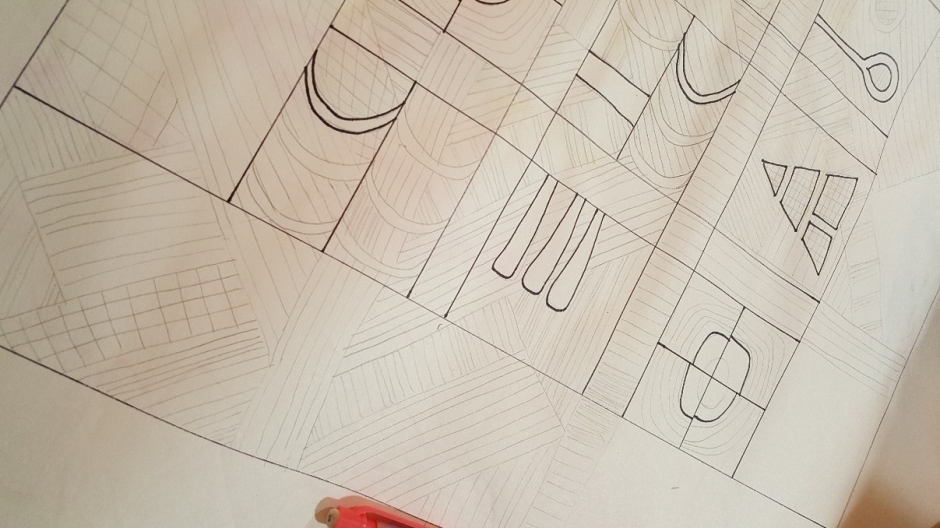
Next, take 2 ( or 5) of your applique pieces and trim off the upper left corner, rounding it into a quarter oval-ish shape. Keep your curve long and extend it over the rectangle so it takes off more than just the tip of the corner. You want it to feel like a hill, not a speed bump. Aim for something like the shape of the first two pieces below:
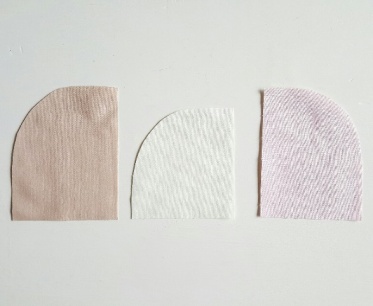
You’ll do the same thing with the remaining 1 (or 4) applique pieces, this time rounding off the upper right corner, like the piece on the right above.
Tip: Notice how the one in the center is smaller? I trimmed a bit off the top as I rounded the corner. And I trimmed some off the right side of the far right pink one too, making it a bit narrower than the others. The goal here is to make them a little random. Organic. Improv-y. Just be free with it. As long as your curve stays smooth, you can’t go wrong.
Marking:
I generally eyeball it on a shape like this and do not mark a stitching line. If you prefer to use one, you can draw it on with your favorite marking tool. I’m a bit wary of Frixion pens as a universal tool, but find that they work well for this step. Since the line gets folded under as you sew, there’s no risk of marks showing up on the quilt surface.
Mark your line along the curve, leaving a seam allowance that is more than 1/8” but less than ¼”. I like to think of it as a “fat eighth”.

Tip: If you make it too wide, there is extra bulk to ease under and it results in a sewn edge with little bumps and points instead of an even, smooth edge. A narrow allowance can be a bit scary at first, but it truly makes all the difference in the finished look of your applique.
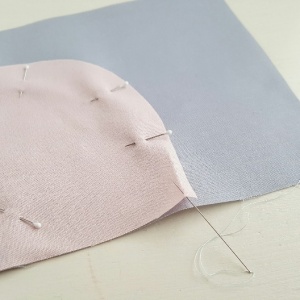
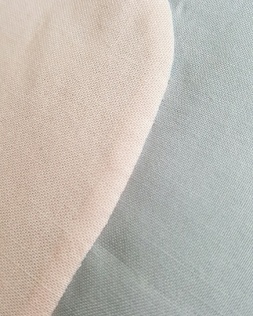
Now layer each of your quarter opals on a background square in a corner, matching up the edges like this:
Basting:
I typically pin or use a few drops of glue to hold pieces in place. (Mainly because I’m in too much of a hurry to get to the sewing part to bother with anything else.)
Tip: There are many other methods for this too. Hand-basting is what Carolyn Friedlander uses and explains in her book Savor Each Stitch. While Anna Maria Horner uses her sewing machine to baste pieces.
Stitching:
Thread your needle (I use a size 10 milliner) with about an 18” length of thread, knot the end, and run it through thread conditioner if you’re using some. (It is not essential, but if you find your thread keeps knotting and twisting up on you, check first to make sure it’s not too long then give conditioner a try. It can really make a difference.)
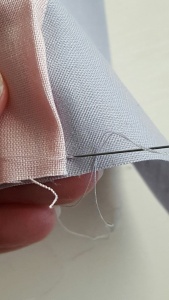
Start at one of the straighter ends of the applique curve.
Tip: I am right-handed so I always sew with the applique to the left, working counter-clockwise around the piece. If you are left-handed, you’ll do the reverse, working with the applique to the right and sewing clockwise around it. I’ve found it easiest to get started by finger pressing the seam allowance under for the first inch or so.
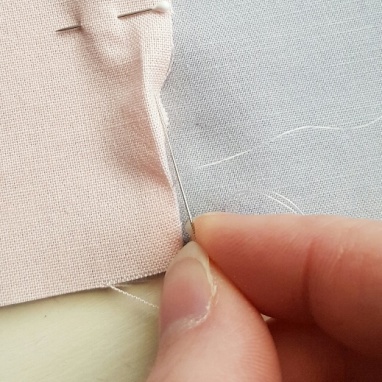
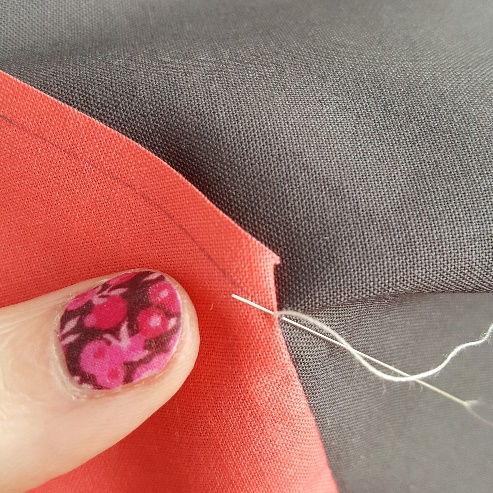
Bring your needle up from the wrong side of the applique piece in the crease you made, about 1/8” away from the bottom edge.
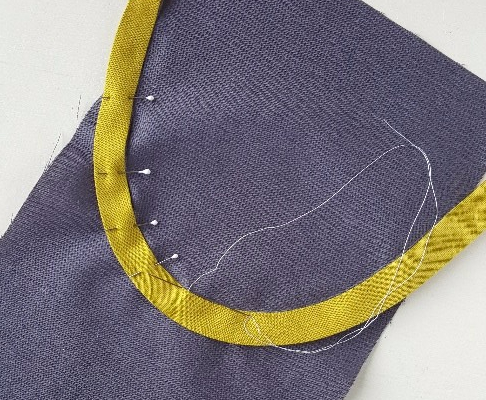
Use the crease you made to tuck the seam allowance under the applique. To make the first stitch, your needle goes down into the background, right next to where it came out of the fold, perpendicular to the edge of the applique:
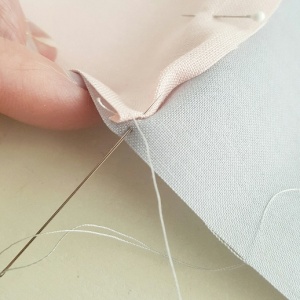
Then, in the same motion, bring it back up through the background and out through the center of the fold (or on your drawn line if you’re using one) about 1/8” away from the first stitch.
You’ll only need to catch a couple of threads on the applique with each stitch. If you get much more than that, the stitch will show. The stitch itself is essentially a tiny tack stitch, on the very edge of the applique’s fold.
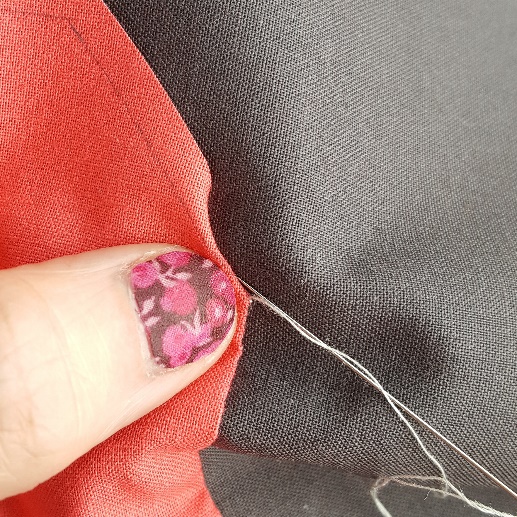
Work the next stitch the same way, using the length of your needle to push the seam allowance under before you stitch. I could not get a great photo of this step as it’s more of an action (and a two handed one at that) but hopefully this will give you an idea of what I mean. (If not, there’s always Google, right?)
Tip: On a shape like this, you can continue to finger-press the seam allowance under as you go, or use your needle to push/turn it under along the marking line. (That’s why it’s called needle-TURN, get it?) Or use a combination of both. Find what works for you and be patient with yourself while you are learning. Keep working your stitches one at a time all the way around the shape. Because your curve is gentle, and your seam allowance is narrow, you don’t need to clip anything. It will lay nicely for you without it.
With practice, your stitches will be nearly invisible.
Tip: If you find that the stitches are showing more than you like, make sure you aren’t catching too much of the applique- a couple threads is all you need. It may also be that you are bringing the needle out toward (or on) the surface of the applique, rather than on the edge of the fold. Aim to come out right in the center of that crease and your stitches will disappear.
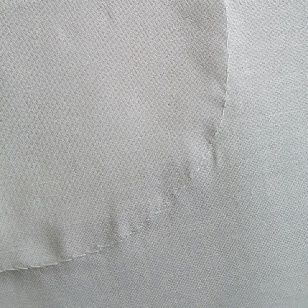
When you get to the end of the curved edge, knot your thread on the back and trim it. The back will look like a slightly wonky running stitch:
Applique the other 2 ( or 8) pieces to their backgrounds.
They will go surprisingly quickly once you get into the stitch/turn under rhythm. Blocks like these also make great portable sewing for school pick-ups or waiting rooms or just TV watching.
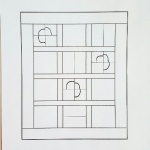
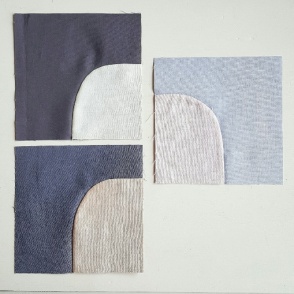
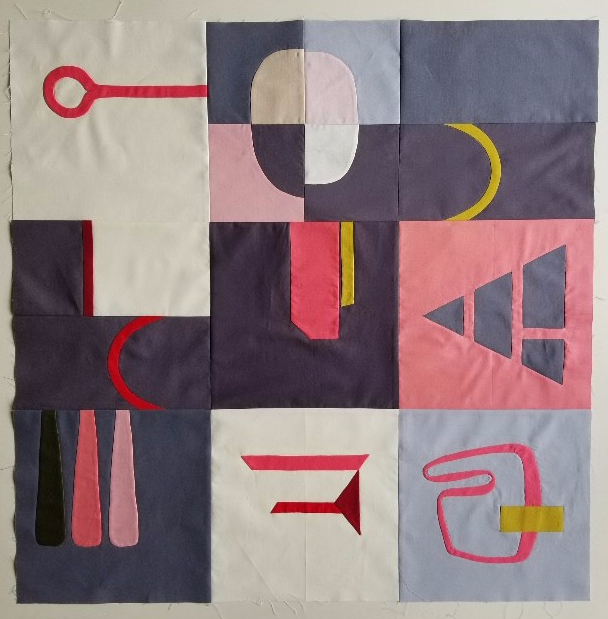
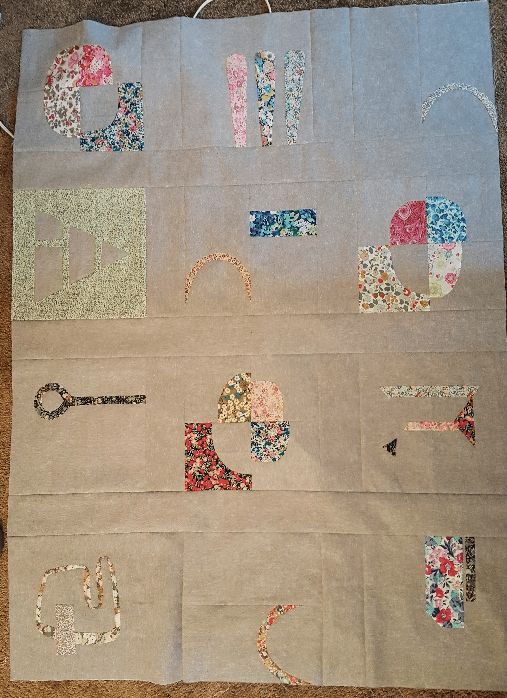
The following are not to scale, but so you have an idea of where this block of the month is heading, here is where your just-completed blocks will go in the final layouts: (wall, then lap size)


If you have any questions about anything here or would like more information, email me at thebespokeoutlaw@gmail.com or come find me on Instagram at @bespokeoutlaw. I will continue to post hints and tips there too.
Next month we start using templates! Hooray!
March
Minimal Day Sampler – Block Two: Fringe
It seems like everyone is off to a good start with last month’s Quarter Opals blocks. How did you find it? Any trouble with the appliqué at all? The blocks I’ve seen look fantastic! What’s even better still, is that none of you have sworn directly at me (at least not yet), so I take that as a good sign. Ready for more?
This month’s block is called Fringe, based on the elongated teardrop shape of the metal pieces that dangle from the inspiration pendant. (You can see it in the photo on the January post.)
All of the remaining blocks will use templates in some way. Don’t worry though! They are really simple to use as long as you know a few things ahead of time:
- Appliqué templates DO NOT include a seam allowance. So when you are transferring them to your fabric, you need to leave space around them for the seam allowance.
- Always trace them on the RIGHT side of your fabric. The line you trace is your stitching line and it needs to be visible.
- Don’t use chalk to trace templates on your fabric. Because the piece will be handled quite a bit while you’re stitching, chalk often wears off before you’ve finished and then you have to wing it. (However, if adrenaline-fueled quilting is your thing, by all means go for it! You are the boss of your process.)
Feel better? Excellent. Let’s get started.
Begin by printing out a copy of the template, making sure the scaling on your printer is turned off. The cut-out template should be around 7 ½” long.
Tip: I’ve simply used copier paper for all of the templates for this quilt, which has worked fine. None of them will be used more than a few times and they don’t need to be terribly precise. But if you prefer something stronger, feel free to transfer them to cardstock, template plastic, or whatever you like.
Whether you are making the wall or lap sized quilt, this month’s block is the same for both.
Cutting:
- From background fabric: Cut one 10 ½” square
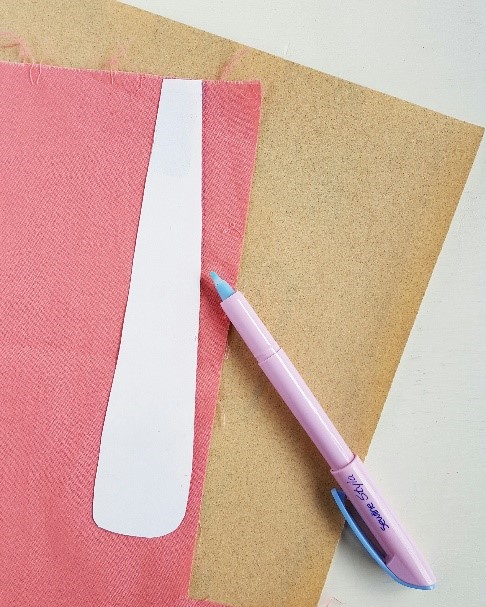
- From appliqué fabric: You’ll need 3 scraps that are at least 2” x 8”, though you don’t need to trim them down to that size. Just be sure they are at least large enough to allow for the template and seam allowance.
Marking:
On the RIGHT side of an appliqué fabric, place the narrow end of the template on a cut edge and trace around it, using whatever pen/transfer method you like. Be sure you are leaving enough space around it for a seam allowance that is more than 1/8” but less than ¼” (i.e. a “fat eighth”).
Repeat this process on a second appliqué fabric.
Flip the template over and trace it on the RIGHT side of the third appliqué fabric. The template isn’t symmetrical so this adds a nice bit of variation in the finished block.
Tip: Use a sheet of fine grit sandpaper (from the hardware store) under the fabric while you trace. It holds the fabric smooth and prevents those little skips and drags that the tip of your pen can cause. You’ll get a nice clean line without the struggle.
Cut out the appliqué pieces, adding a “fat eighth” seam allowance.
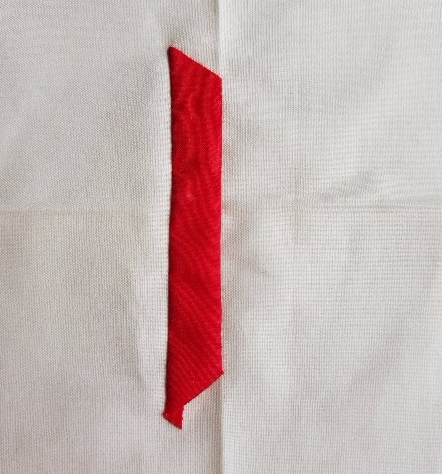
Lay out the appliqué pieces on your background square as shown:
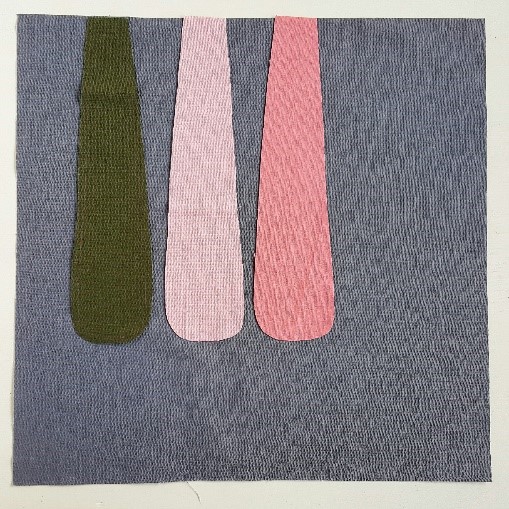
The top edge of all three appliqués should line up with the top edge of the background square. They should be grouped off-center toward the left side of the block, roughly 1 ½” from the left edge and nearly touching at the widest part of the appliqués. When you are happy with the placement, baste or pin the piece on the left (setting the others aside).
Stitching:
Starting at the top edge of the block, stitch down the left straight edge, around the bottom curve and back up the right side of the appliqué. Do not stitch across the top of the appliqué. That edge will be enclosed in the seam when the blocks are joined later.
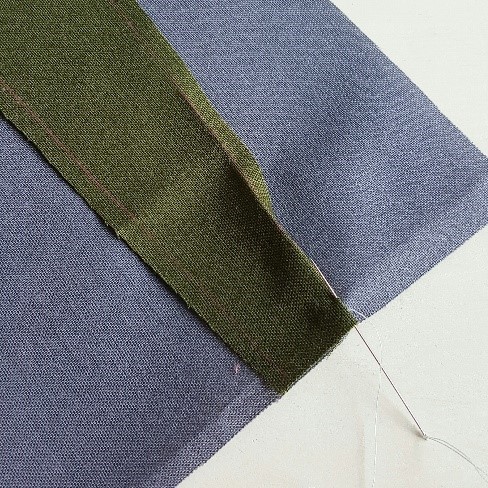
Tip: I found it easiest to finger press the seam allowance under on the long straight sides before stitching. It gives a nice, crisp edge that is easy to stitch. Then I used the needle-turn technique to go around the curves at the bottom. These are much tighter curves than we did in the last block, so it is especially important to only turn under enough of the seam allowance to take one stitch at a time. Turning under too much at once or working with a too-wide seam allowance will cause little points and bumps along the edge instead of a smoothly rounded curve.
Add the other two pieces back to your block, according to the above layout, this time basting or pinning the middle piece down. Set aside the third piece and stitch down the middle one.
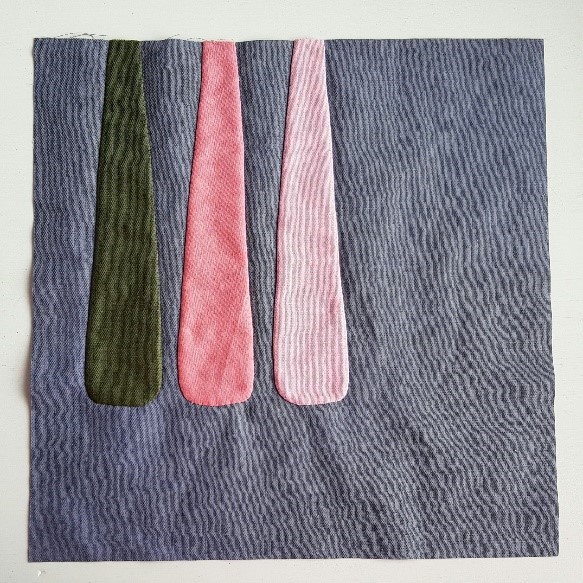
Finally, add the third appliqué in the same manner as above. Your finished block should look something like this: (you may want to actually iron yours before taking any photos of it though…)
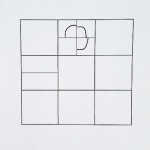
Your new block will go here in the final quilt layout (wall, then lap size):


As always, if you have any questions about anything here or would like more information, email me at thebespokeoutlaw@gmail.com or come find me on Instagram at @bespokeoutlaw. I will continue to post hints and tips there too.
Next month we’ll add bias strips!
April
Minimal Day Sampler – Block Three: Bias Curves
Most of us, as quilters, have used bias strips or bias tape at some point in one project or another. (A fabric’s bias runs diagonal to the grain, at a 45 degree angle to the selvedge.) Love it or hate it, nothing else will give you a smooth curve, or a rounded finished edge, quite like bias tape. Often in appliqué, it is used for vines, stems, and basket handles. Yeah. We’re not going there. Instead, we’ll be making a simple arc to mimic the center wave-like portion of the inspiration pendant. (Look back at the January post for a reminder.)
There are lots of methods for making bias strips. Gadgets are widely available, like bias bars and bias tape makers. But if you don’t have any of those, there are online tutorials for making it with everything from paper templates to just a couple of straight pins. If that seems like too much bother, you can go old school and just press your strip in thirds, with one raw edge on the inside and one underneath. It doesn’t matter which technique you use as long as you are careful to cut your strips on the true bias of your fabric so they have enough stretch to curve nicely, while still lying flat.
We’ll start this month’s block by printing out a copy of the template, making sure the scaling on your printer is turned off. The cut-out template should be 5 ½” wide across the top straight edge.
Cutting:
- From background fabric(s): Cut 2 (or 3 for lap size) rectangles 5 ½” x 10 ½”
- From appliqué fabric(s): Cut 2 (or 3) strips 1” x 12” on the bias of the fabric
Tip: I’ve used a bias tape maker which turns a 1” strip into ½” bias tape, because it was what I had on hand, but if you have one that makes another size, feel free to use it. Just be sure to cut your strips to the correct width for your bias tape maker or chosen method.
Marking:
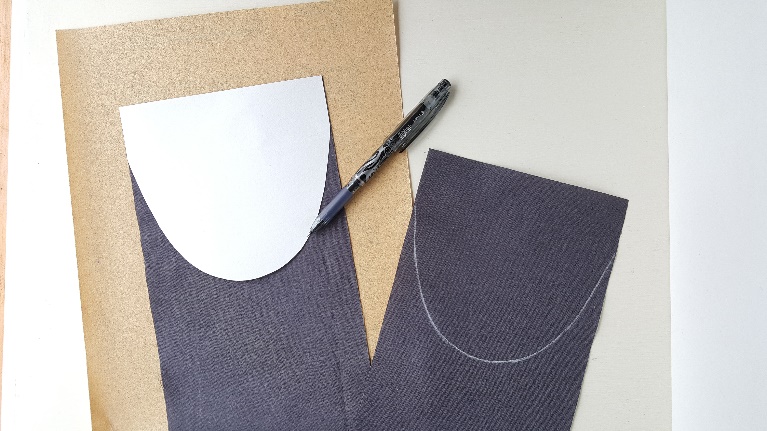
On the RIGHT side of your background pieces, align the template with the 5 ½” end of each piece and trace the curve onto the fabric. (I’ve marked the right one below with chalk to make it easier to see in the photo, but I don’t recommend using that method as it can wear off before you’ve finished stitching. For more tips on using templates, take a look at the March post.)
Press your bias strips, using your preferred method, so all the raw edges will be enclosed when stitched.
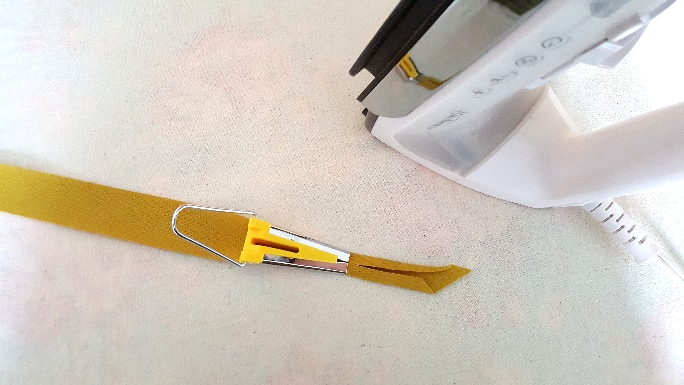
Tip: After making the bias tape, use the iron to press it again a few times (being careful not to stretch it), while slightly curving it a bit more with each pass. It makes easing the strip around the curve much quicker since it will already be partially bent for you.
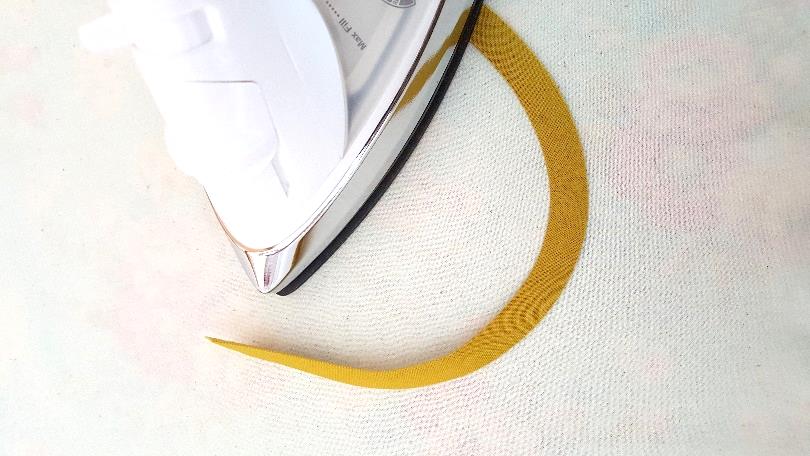
Align the top fold of one of your bias strips with the line on a background fabric, easing it around the curve so it lays flat without stretching it. Pin often as you go.
Tip: Let the bias tape ends extend a bit past the edge of the background, rather than trying to match them up at the sides. It’s much easier to just trim them even with the edge of the block after stitching.
Stitching:
Beginning with that top fold, which runs along the inner curve, appliqué the bias strip to the background. Then stitch the outer curve.
Tip: Stitching the inner side of a bias curve helps ensure that it lays flat. If you begin with the outer curve, the inner curve often puckers and doesn’t finish as nicely.
Trim the ends of the bias tape flush with the edge of your block and press.
Your finished blocks will go here in the final quilt layout (wall, then lap size):


As always, if you have any questions about anything here or would like more information, email me at thebespokeoutlaw@gmail.com or come find me on Instagram at @bespokeoutlaw.
Next month we’ll learn how to manage appliqué shapes with corners!
May
Minimal Day Sampler – Block Four: Buildings
When you first saw the brooch in the inspiration photo, did it remind you of anything? To my mind, it has always been the map of a swank, mid-century mod housing development. All curvy roads and tiny, angular buildings. The kind of neighborhood where there are no frozen pizza dinners, only cocktail parties. No sweat pants, only dressing gowns. Everything is immaculate and the conversation is witty. Clearly imaginary, but fun to visit, nonetheless. So I’ve added some of those buildings to this month’s block, since it’s the closest I will ever get to a swank, sweat-pants free lifestyle.
Are you with me? Excellent. If not, feel free to go back to your hors d’oeuvres.
The angular corners of these buildings present another appliqué skill to tackle: points. Most of the points in this block are obtuse or right angles which are much easier to stitch because there is more room for the seam allowance to fit easily under the appliqué. There is one that is slightly acute though, which requires a bit of a different approach to stitching.
Begin by printing out a copy of the template, making sure the scaling on your printer is turned off. The large cut-out template should be around 2 ½” x 6 ½” and the smaller one should be around 5/8” x 4 ¾”.
Whether you are making the wall or lap sized quilt, this month’s block is the same for both.
Cutting:
- From background fabric: Cut one 10 ½” square
- From appliqué fabric(s): Trace around and cut one of each template shape, placing the top ends along the cut edge of your fabric and leaving a fat 1/8” seam allowance on the remaining 3 sides.
Tip: For information about tracing templates and cutting appliqué pieces, refer back to the “Marking” section in the March post.
Lay the larger appliqué piece on your background, with the left stitching line 4 ½” from the left side of the block, aligning the top edges.
Stitching:
Beginning at the top of the left stitching line, stitch down to the first drawn point.
Tip: For all straight edges like these, it is helpful to finger press your seam allowance under before you stitch, folding along the drawn line. You can also do it by needle-turning the seam allowance under as you go, but I find finger pressing gives me a less wobbly finished edge.
When you get to the corner at the end of your stitching line, take an extra stitch right at the corner to secure it.
Then, while pinching the point between your thumb on the front of the block and your index finger from behind, use the side of your needle to sweep the seam allowance under the appliqué from right to left. Only let go of the point long enough to sweep the needle under it as needed, then pinch it again. Adjust the seam allowance as needed, easing it back out with the side of your needle from left to right this time, until the fold falls on the stitching line.
If you aren’t happy with how it lays, pull the seam allowance back out with the needle and try again.
Tip: You may get some frayed threads during this process. Don’t let them freak you out. Just keep tucking them under. They are just another part of the seam allowance.
Once you are happy with how your seam allowance lays, continue stitching along the angled edge until you get to the next corner. When you have stitched right up to it, repeat the steps above. Continue around the third corner and down the remaining long side, finger pressing as you go.
Place the smaller appliqué on the background square to the right of the piece you just stitched, leaving 1/8” between the right edge of the sewn piece and the left stitching line on the new piece. If you’re seam allowance is narrow enough, they will just touch.
Stitch down to the first point and repeat the extra stitch at the corner point. This corner is a much shaper angle, so it helps to remove a bit of the extra seam allowance to reduce bulk. Fold back the left side of the appliqué piece, exposing the seam allowance at the point. Trim off just the tiny dog-ear corner of the seam allowance as shown.
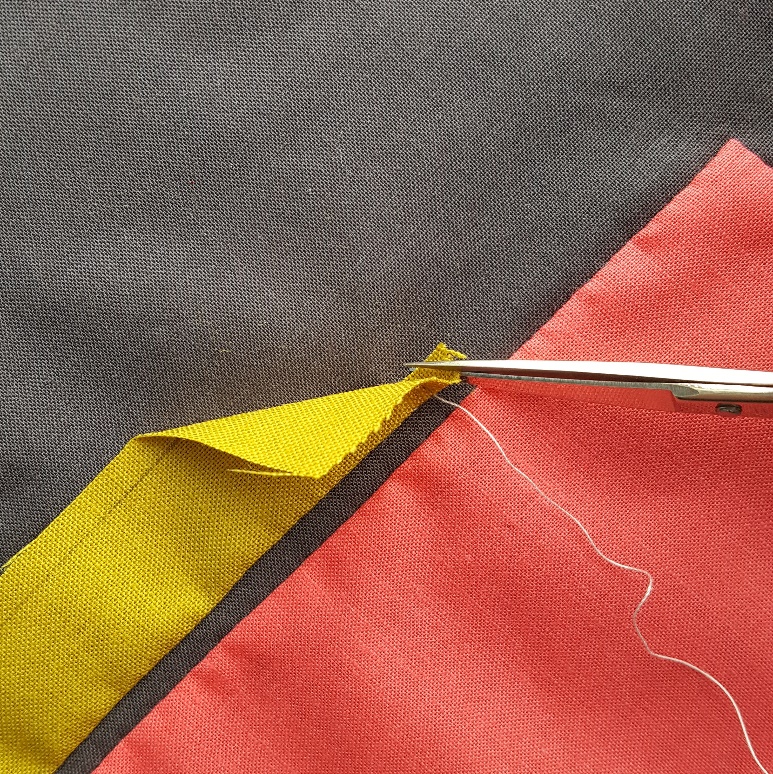
See how tiny that is? You don’t want to take off too much or you could affect the integrity of the appliqué piece. But in such a tight corner, every thread counts.
Then use the method above to sweep the seam allowance under and stitch across the short end, turn the next corner (which doesn’t require trimming) and stitch the remaining side. Your finished block will look like this:
Your new block will go here in the final quilt layout (wall, then lap size):


As always, if you have any questions about anything here or would like more information, email me at thebespokeoutlaw@gmail.com or come find me on Instagram at @bespokeoutlaw.
We’ll do more acute angles next month, learn how to butt two pieces together, and use an over-lay to help with appliqué placement.
JUNE
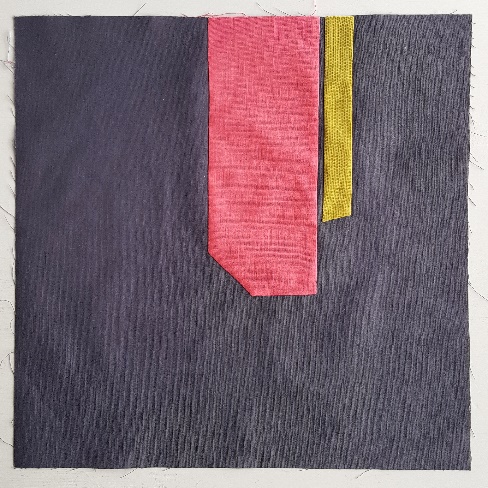
Minimal Day Sampler: Block 5 – Facets
One of the most unique things my great uncle made was something he called “table jewelry”: small architectural sculptures of various metals that incorporated beautiful stones. They were made so the negative space within the sculpture was a part of the design itself and helped show off the stones.


Such a perfect concept for a modern quilt, no?
So for this month’s block, I chose three facets of an emerald cut stone as our design, with plenty of negative space surrounding and supporting them. Each piece has points of varying degrees, which are perfect for practicing the techniques we learned last month. The way the facets line up gives us an opportunity to overlap appliqué pieces and to butt two points together. They are also the first pieces that are free-floating within the block. So we’ll use an overlay to help with placing them.
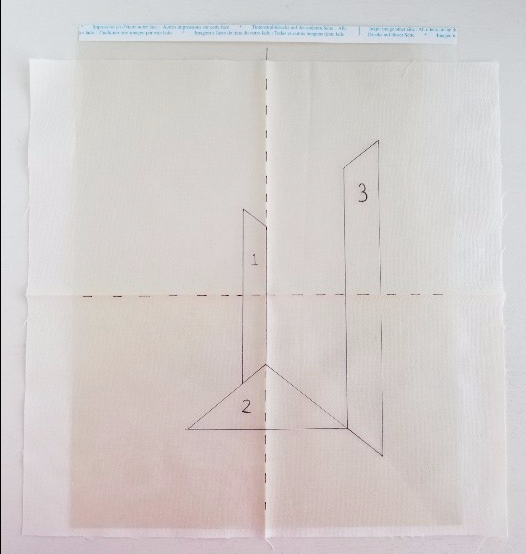
Begin by printing out a copy of the templates, making sure the scaling on your printer is turned off. The longest template should be around 3/4” x 7”.
Before cutting the templates apart, you’ll need to make the overlay. You can use any see-through material that you can write on and is flexible- clear vinyl, a ziploc bag, a sheet protector, etc. (I’ve used a sheet of transparency film because I happened to have some.) Lay it over the printed template page and use a Sharpie to trace the 3 appliqué pieces as well as the horizontal and vertical dashed registration lines. You’ll notice also that the pieces are numbered, indicating the order in which we’ll sew them.
Whether you are making the wall or lap sized quilt, this month’s block is the same for both.
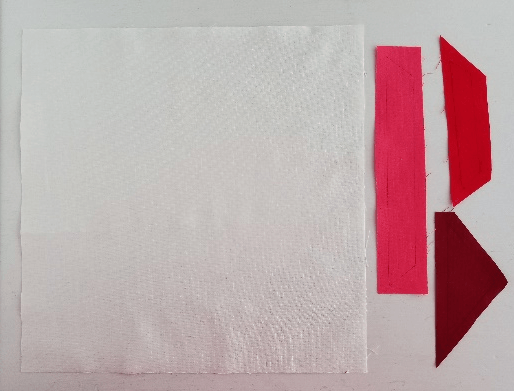
Cutting:
- From background fabric: Cut one 10 ½” square
- From appliqué fabric(s): Trace around and cut one of each of templates 2 and 3, leaving a fat 1/8” seam allowance on all sides. Do the same for template 1, except make the seam allowance a full ¼” on the bottom edge (which will go under piece 2).
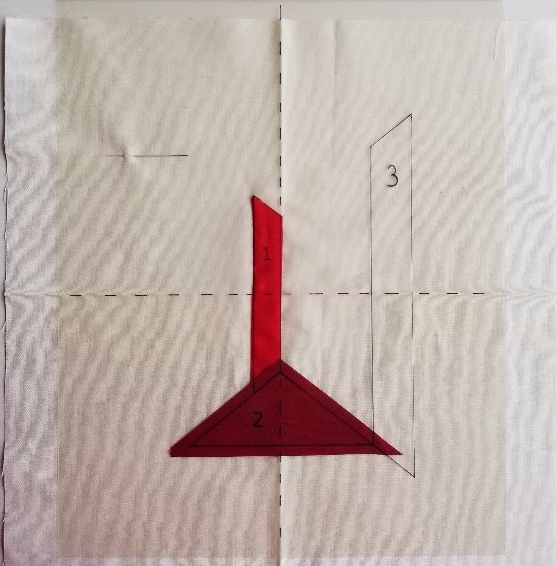
Press your background block in half and press a crease into the center. Open it, fold it in half the opposite direction and press another crease. Your block should be equally divided into 4 quadrants. Now place your overlay on the background, lining up the dashed lines with the creases you just made.
Lift up one edge of the overlay and slide appliqué piece #1 into position. The drawn stitching line should fall directly beneath the matching lines on the overlay.
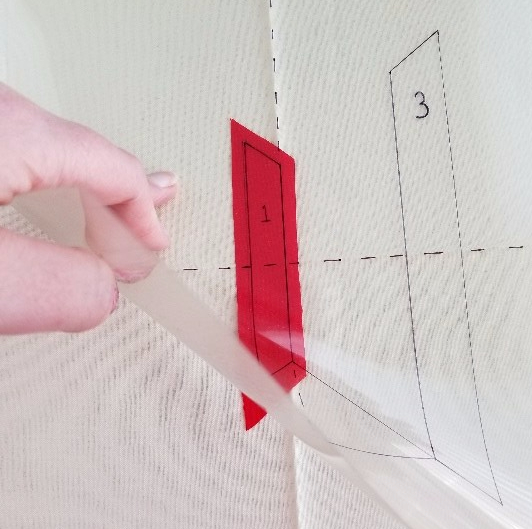
You can pin the overlay to the background along one or two sides if you like, but I am frankly too lazy to bother. I typically just hold it in place with one hand while I adjust the appliqué with the other.
Tip: I finger pressed all of my seam allowances under on each piece before stitching, just to make it a bit easier to make the lines straight (or at least straight-ish).
Stitching:
Begin stitching at the bottom of the right side of the appliqué, below the drawn line at the bottom of the template. Stitch up the right side, across the top, and back down the left side. Do not stitch across the bottom. That edge will be hidden beneath piece #2.
Tip: Refer back to the “Stitching” section in the May post for more details on stitching points if you need a refresher.
Tip: Whenever appliqué pieces overlap, always begin with the piece on the very bottom, working up layer by layer. To avoid as much bulk as possible, do not turn under or stitch any seam allowances that will be covered by another piece.
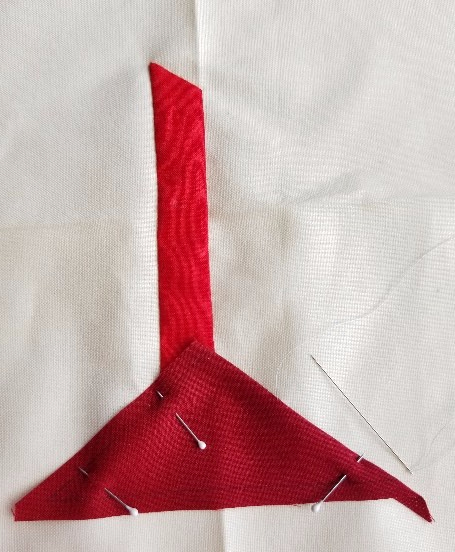
Put the overlay back on the block, lining up the dashed lines with the creases and place piece #2 in position just like you did with the first piece. This piece will overlap and enclose the raw edge on the bottom of the first piece. Since we made the seam allowance wider on that side of piece #1, we’ll have more wiggle room in covering it up with this second appliqué. And a bit of wiggle room is always good.
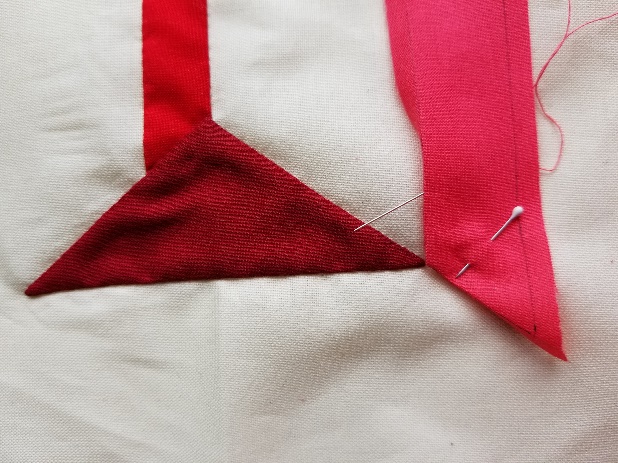
Begin stitching in the CENTER of the upper right side, a half inch or so from the top point and work your way counter-clockwise around the triangle. When you get to the portion that overlaps piece #1, simply treat that first appliqué as part of the background and stitch through it right along with the background fabric.
Tip: NEVER begin stitching on an appliqué at a point or corner. If you do, you will end up back at that point with the opposing side already stitched and no way to tuck that last point’s worth of seam allowance under it. Which will totally make you swear and reach for your seam ripper. Trust me on this one. Always start on the straightest edge or gentlest curve of the piece.
Once again, align the overlay with the creases and place piece #3 in position.

Notice how this piece touches only at one point on the previous piece? Any time two pieces touch without actually overlapping, it is called “butting”.
Stitch counter-clockwise around piece #3 beginning at the lower left side, a half inch or so from the point. This will allow you to immediately anchor the corner that butts up to piece #2, minimizing the impact if the piece shifts out of place slightly as you stitch around the rest of it.
Tip: If you find that the points of pieces #2 and #3 don’t quite touch as you’re stitching them, don’t worry. Just make a longer, visible stitch (in a matching color) connecting both pieces at the contact point.
When you’ve made your way around piece #3, your finished block will look something like this:
It will go here in the final quilt layout (wall, then lap size):


As always, if you have any questions about anything here or would like more information, email me at thebespokeoutlaw@gmail.com or come find me on Instagram at @bespokeoutlaw.
Next month we go back to curves and will learn how to stitch a deep “v”.
JULY
Minimal Day Sampler: Block 5 – Facets
Alright, I’m not going to lie. This month’s skill is probably my least favorite of all the general appliqué techniques: the deep “v” (or “valley” if you prefer). It has the potential to be a tricky buggar and requires a bit of patience. (A little chocolate/booze/swearing never seems out of line either. Or maybe that’s just me.) But it can totally be done! And with a few tips, it’s very manageable. So don’t worry, we are in this together. Of course feel free to have the chocolate on stand-by, just in case.
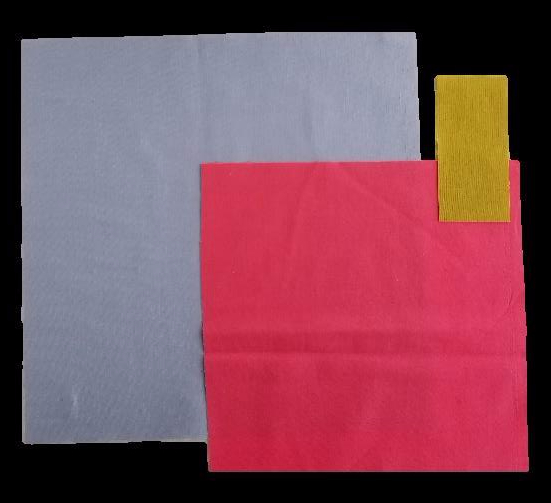
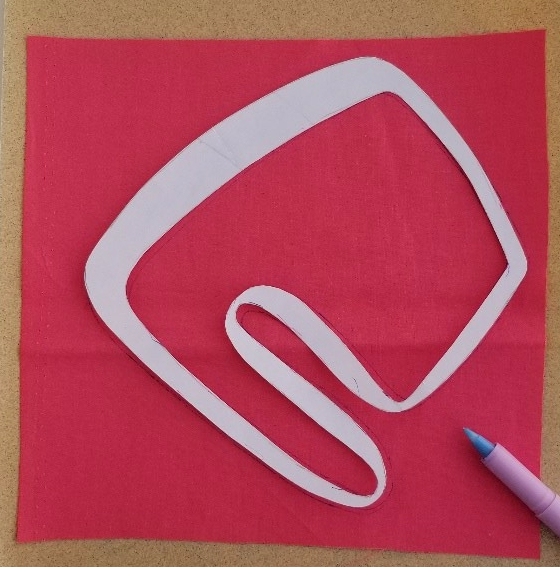
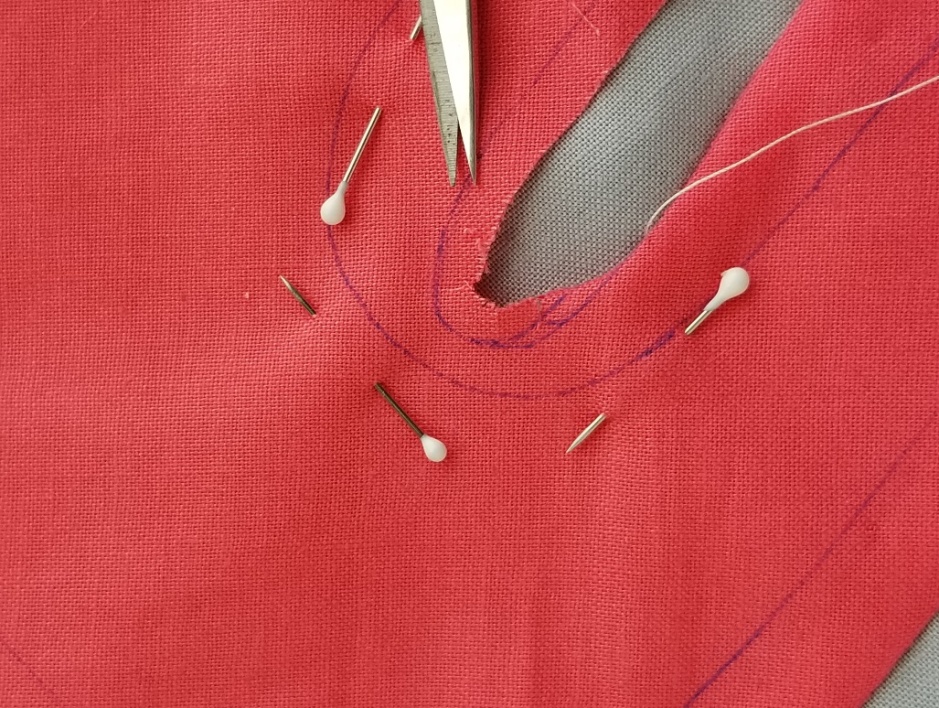
The shape for this appliqué was taken from the long eye-pins that are used to suspend the opal pendant (look back at the January post to see the inspiration piece). It has a wonderful round loop at the end that makes a perfect little “v” shape on the inside curve. The loop itself is also a tighter curve than we’ve tackled before, so we’ll talk about some tricks to help manage that in addition to the technique for stitching the “v”.
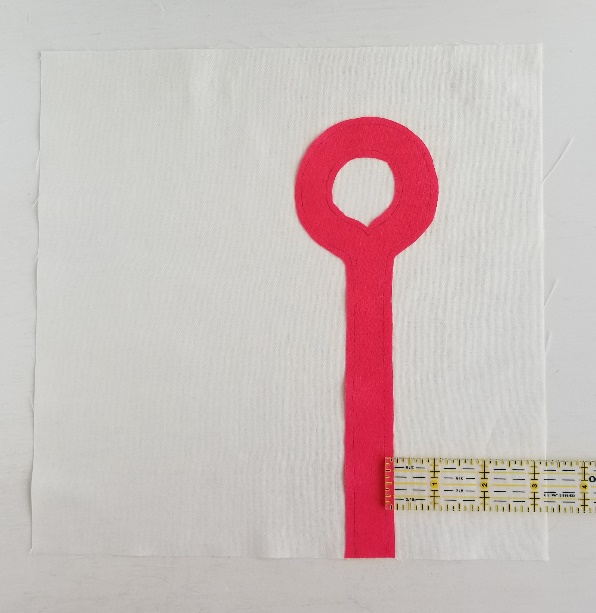
Begin by printing out a copy of the template, making sure the scaling on your printer is turned off. The template should be around 8 ¾” long.
Whether you are making the wall or lap sized quilt, this month’s block is the same for both.
Cutting:
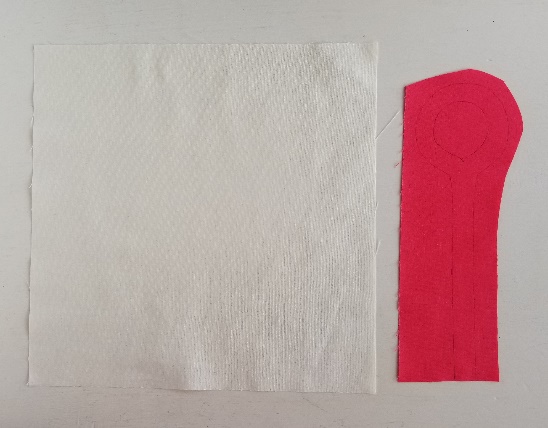
- From background fabric: Cut one 10 ½” square
- From appliqué fabric: Trace around the template and cut out, leaving a fat 1/8” seam allowance on all sides. Cut out the interior of the loop as well, using the same seam allowance.
Align the appliqué so the straight edge is flush with the bottom of the background square and the right stitching line is 3 ¼” from the right side of the block.
Stitching:
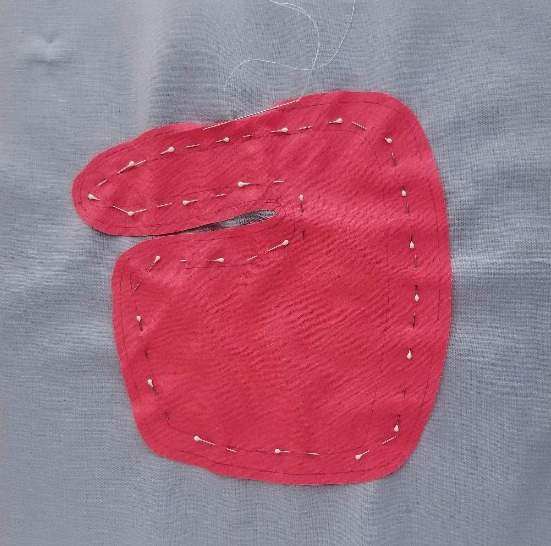
Begin stitching at the lower right of the appliqué. Stitch up the straight side. When you get to the small concave curve at the base of the loop you will begin to feel the seam allowance resisting and not wanting to turn under easily. At this point, it helps to clip into the seam allowance just slightly to release that tension.
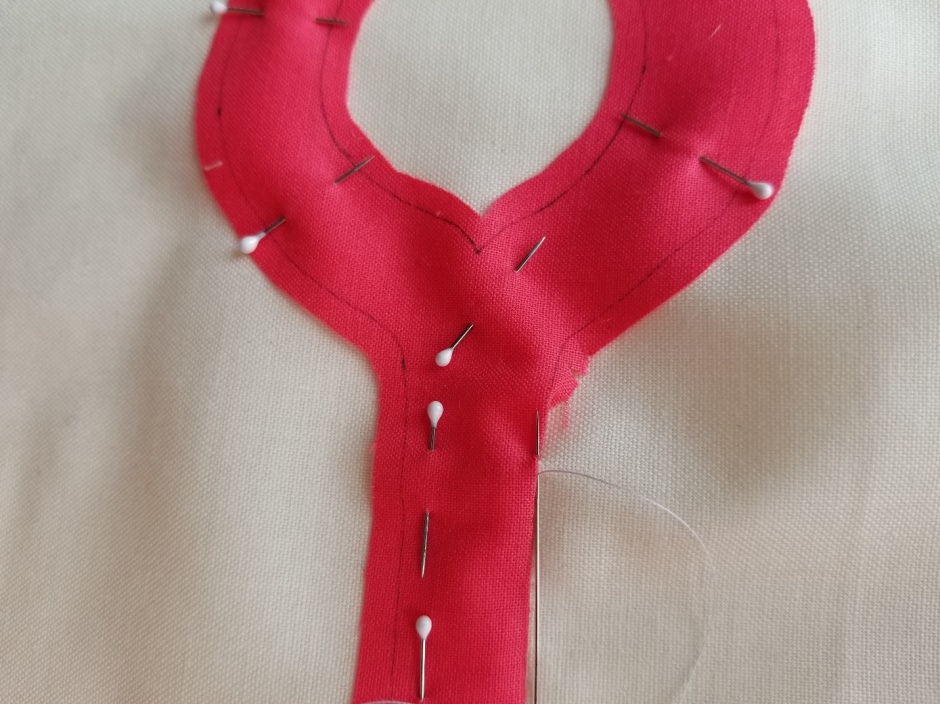
Tip: Don’t cut all the way to the drawn stitching line. Clip to within 2 or 3 threads of it. I’ve used two cuts here, about 1/8” apart and it worked beautifully. If you still find it won’t lay nicely after you’ve clipped it, try making your cuts the tiniest bit deeper- just by another thread or two.
Continue stitching up and around the convex curve of the loop portion.
Tip: If your curve has bumps or points and isn’t completely smooth, the culprit is likely one of two things: A) The seam allowance is too wide and there is too much fabric to ease under the piece easily. Or B) You are trying to cover too much ground with each stitch. Turn under only enough seam allowance for one stitch at a time. Remember that the more pronounced the curve, the closer your stitches should be to one another. Try for 1/8”.
When you get around the loop and to the concave curve leading back to the straight portion, clip it like we did above and continue stitching to the end of the appliqué.
Get a new piece of thread and begin stitching about ¾” from the “v” on the right side of the inner curve.
Tip: Even if there’s enough thread left from stitching the outside edge of the appliqué, it’s worth starting a new one here. As you sew, the thread gets worn and picks up twist, and becomes more likely to knot or break with each additional stitch. The WORST feeling is stitching the “v” perfectly, only to have the thread break just as you start up the opposite side. Trust me on this. There’s no need to terrify your pet/toddler/spouse with a sudden burst of expletives. Just start with a new thread.
Begin stitching your way toward the “v”. The seam allowance is going to resist turning under within a few stitches, so you need to stop and clip directly into the “v”. You’ll need to cut straight into the point, not at an angle. Cut right up to the stitching line.

Tip: As a general rule, it’s always good to avoid clipping into a “v” or very deep curve until the last possible moment. You want to keep the fabric intact as long as you can while you’re handling it so it frays as little as possible.
As you make the next few stitches, the seam allowance will get narrower and narrower. Don’t worry, just keep sewing. Your stitches should be very close together at this point- 1/16” or so.
It’s very likely going to fray. That last bit leading up to the “v” will be a thready mess. Don’t panic. Just keep nudging the threads under and take another stitch. Those threads are your seam allowance. Those threads are your seam allowance. Say it with me – those threads are your seam allowance. It’s all good.
Tip: You may find it easier at this point to switch to a stab-stitch (where the needle goes from front to back and you pull the entire thread to the back before putting it through to the front again) rather than the all-in-one-motion type of stitch typically used for appliqué. The stab-stitch doesn’t seem to dislodge those threads that you’ve so carefully tucked under quite as much.
When you get to the deepest point of the “v”, take an extra anchor stitch right at the point. It’s fine if it shows. You want to stabilize that part of the fabric as much as possible and since we’ve cut all the threads leading up to it, it can use a bit of extra support.
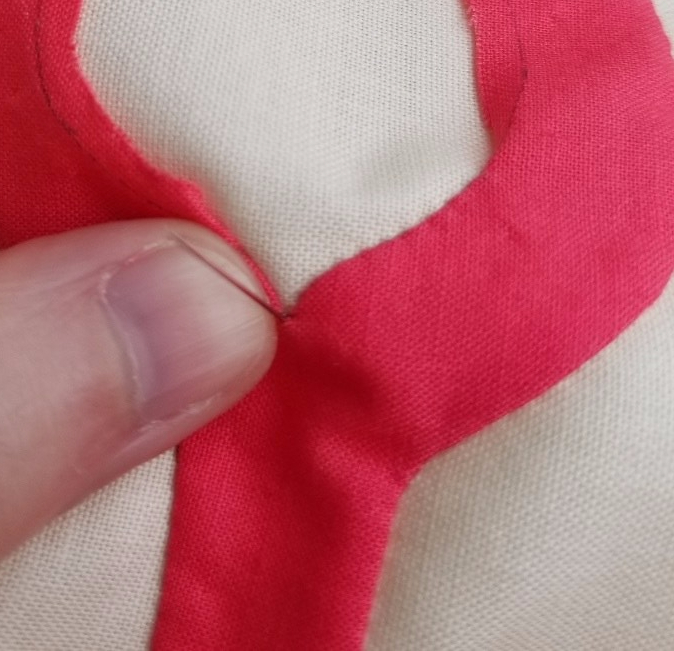
Now, starting about 1/4” or so to the left of the “v”, use the length of your needle to push the seam allowance under and back down toward the “v” (working from left to right). Push under more than just the width of the seam allowance and then ease it back out to the stitching line as you stitch from right to left.
Tip: Don’t be afraid to pull the seam allowance back out and turn it under again if you don’t like how it lays the first time. It usually takes me a couple passes to get it where I am happy with it.
Keep stitching your way up the left side of the “v” and start working around the rest of the inner curve. You will need to clip the seam allowance as you go, to within a couple threads of the stitching line and about 3/16” apart.
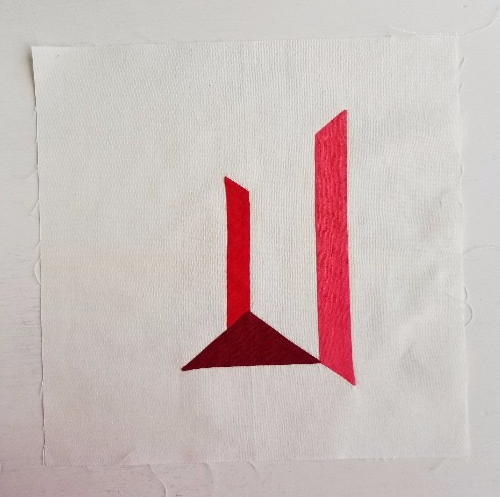
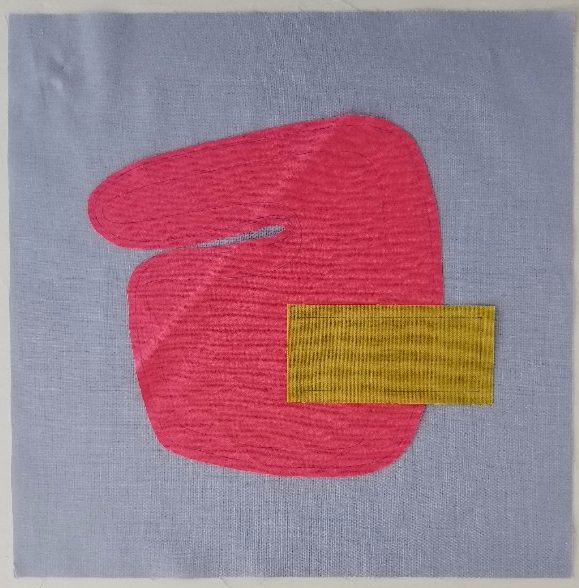
Continue stitching all the way around the inner curve and your finished Loop should look something like this:
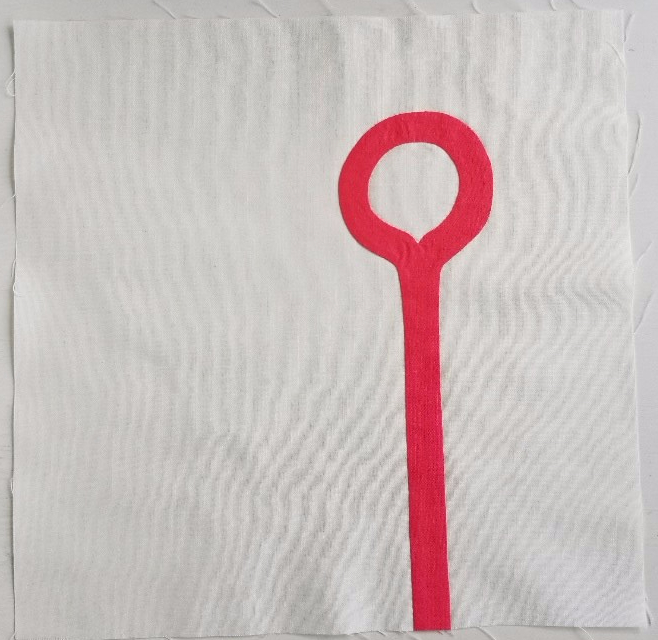
It will go here in the final quilt layout (wall, then lap size):


As always, if you have any questions about anything here or would like more information, email me at thebespokeoutlaw@gmail.com or come find me on Instagram at @bespokeoutlaw.
In August we’ll add some reverse appliqué.
AUGUST
Minimal Day Sampler – Block Seven: Reverse Quarter Opals
Our block this month is a quick and simple one, a filler to complete the fourth spot in the opal blocks we made way back in February. It’s also a toe-dip into reverse appliqué… Sort of, Kinda…In a very simplified way. (Please don’t call the Quilt Police. I’m sure they’re busy anyway…)
Traditionally, reverse appliqué is done by cutting away a top layer to expose the fabric underneath, then stitching around that opening. Which really isn’t that different from regular appliqué, if you think about it. You’re just stitching the inside of a shape instead of the outside of it. Everything else is the same. And you already know how to do all of that, so this will be an especially easy one.
Cutting:
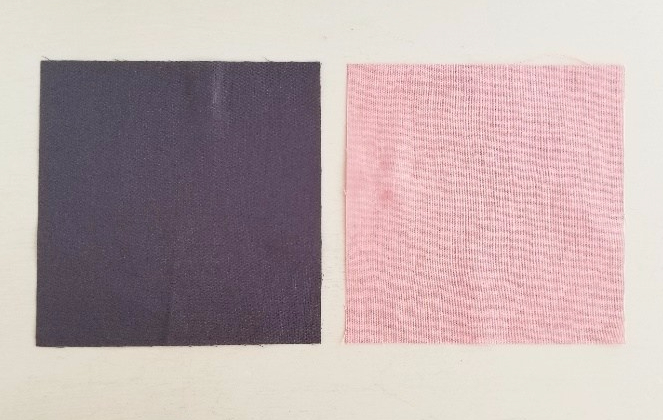
- From background fabric(s): Cut 1 (or 3 for lap size) 5 ½” squares
- From appliqué fabric(s): Cut 1 (or 3 for lap size) 5 ½” squares
Marking:
Place a ruler in the upper right hand corner of 1 (or 2 for lap size) of the appliqué square(s). I’ve placed mine at 3” from the corner on the top and 4” from the corner on the right side. You don’t have to use these measurements, just be sure that the measurement down the right side is larger than the measurement across the top.
Make a small mark in the seam allowance at both points. Then draw a gently curved line connecting the two. It should be a bit oblong. And wonky is just fine too. This line will be your stitching line.

Cut away the upper right corner roughly a “fat eighth” inch from the drawn line.

Tip: If you happened to have already cut ON the drawn line, no big deal. Just draw a new stitching line a “fat eighth” inch in from the cut edge. It’s not going to make much difference in your finished quilt. We are not building a bridge here.
If you are making the lap sized quilt, you’ll repeat this same process for the third appliqué piece, this time in the upper LEFT corner. Again, making sure that your measurement going down the left side is longer than the one going across the top.
Tip: If you are feeling bold, you can throw caution to the wind and eyeball all of this, cutting your shape(s) free-hand. Just be sure to double-check that you are making the correct side of your shape longer than the other, or this quadrant of your opal block won’t fit quite right with the others.
Layer the appliqué over the background square, aligning edges, and pin or glue in place.
Stitching:
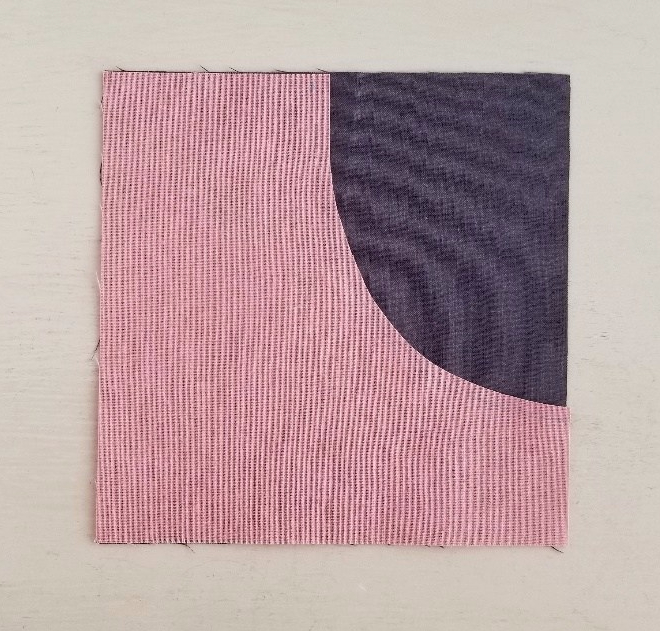
Stitch from the right hand side of the piece, turning under a little at a time as you move around the curve. Because this is such a gentle curve, you won’t need to clip into it at all.

Tip: If you are having a hard time getting it to turn under easily, check your seam allowance. It may be too wide. (I know, I sound like a broken record here, but I keep including this tip because it is a big one. The width of the seam allowance is a huge contributor to the success and ease of appliqué.)
Often, the excess background is cut away when doing reverse appliqué, which you may choose to do, particularly if the appliqué is very light colored and the background shadows through it in a way you don’t care for. If we were building up layers and layers of appliqué with this technique, removing the extra bulk would certainly be helpful. In this case though, I’ve chosen to leave mine intact because a) I like the extra stability and b) I don’t hand quilt, so the extra layers aren’t an issue. When in doubt, remember: you are the boss of your incredible handmade work and you may choose to do it however. you. like.
Your finished block will look something like this:
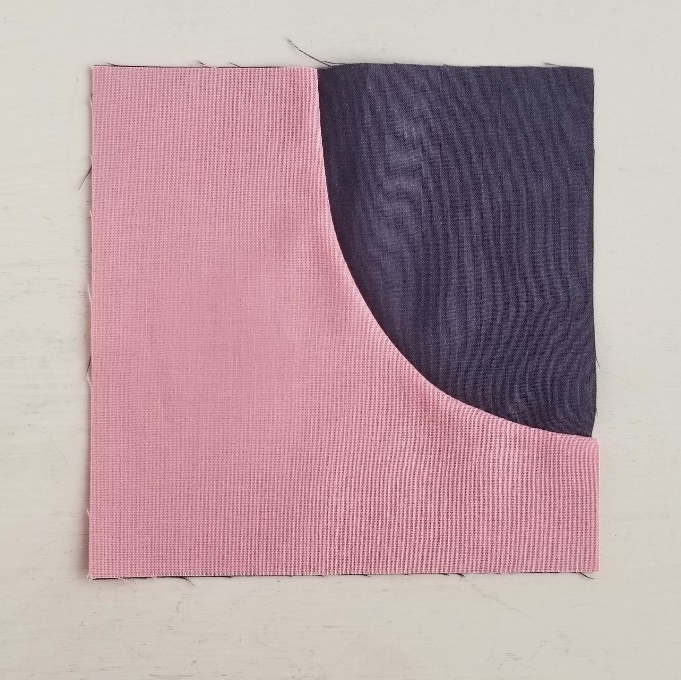
These blocks will go here in the final layout: (indicated by the dashed lines; wall, then lap size)


As always, if you have any questions about anything here or would like more information, email me at thebespokeoutlaw@gmail.com or come find me on Instagram at @bespokeoutlaw.
Next time we’ll combine a couple techniques for a bit more challenging block.
SEPTEMBER
Minimal Day Sampler – Block Eight: Dalle de Verre
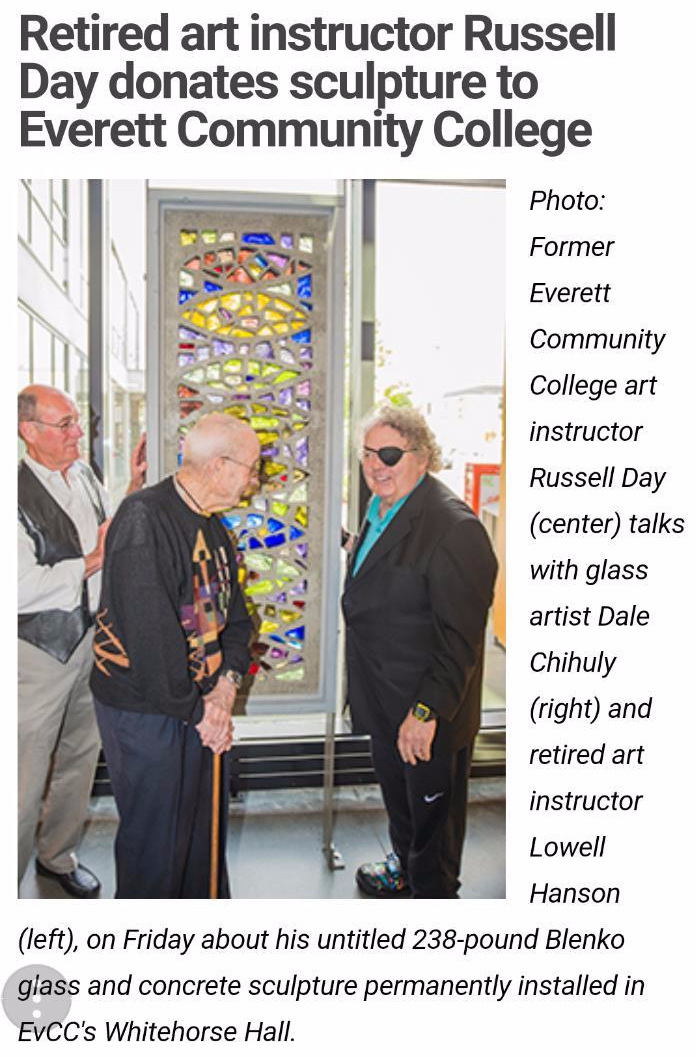
Being fascinated with light, color, and transparency, my great uncle Russell worked extensively with glass, as it was a perfect medium to explore these concepts. Last year, he donated this large glass work to the gallery that bears his name at Everett Community College.
The piece is made from rather thick slabs of glass called dalle de verre. The glass is cut with a chisel and set in a mold, then held together with concrete or epoxy. (Sounds like good old-fashioned, messy fun to me. No? Ah, well, I suppose fabric isn’t nearly as sticky…) Anyhow, I love the resulting irregular shapes of the glass and how they stack and nestle together, while being framed by the surrounding concrete, so this month’s block design reflects that. It is done in true reverse appliqué, where parts of the top layer are removed to expose the layer below. And it will give you plenty of practice on corners, which I apologize for in advance. (Might be good to have the chocolate/wine/happy place mantra on standby, just in case.)
Begin by printing out a copy of the template, making sure the scaling on your printer is turned off. The bottom edge of the triangle at the top should be around 2 1/4” long. Cut out the shapes and discard/recycle them. We will be using the “negative” as our template for this block.
Whether you are making the wall or lap sized quilt, this month’s block is the same for both.
Cutting:
- From background fabric: Cut one 10 ½” square
- From appliqué fabric: Cut one 10 ½” square
Marking:
Fold your appliqué fabric in quarters and press. Unfold the fabric and place the template on top, aligning the registration lines with the creases. (As you can see, I had help decorating my template. Gives it a little something extra though, don’t you think?)
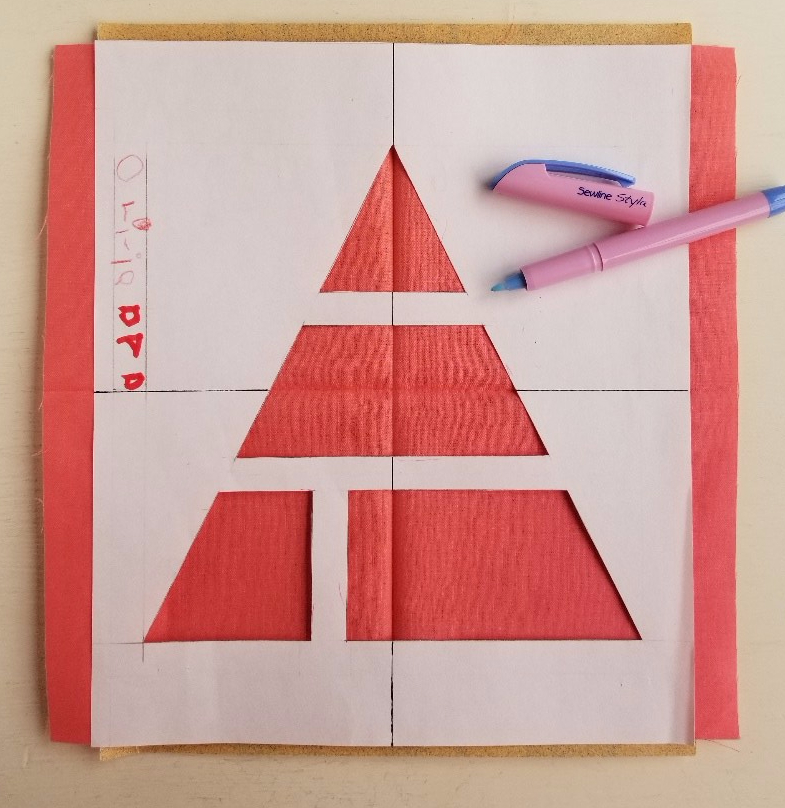
Trace inside each of the 4 shapes. Cut out and remove the fabric inside each shape, being careful to leave your “fat eighth” inch seam allowance as shown. Don’t clip into any of the corners yet though. Place the appliqué layer on top of the background and pin or glue baste to hold it in place.
Stitching:
Beginning in the center of one of the sides of a shape, stitch toward the first corner. When you get close enough to the corner to feel the seam allowance begin to resist turning under, stop and clip directly into the corner, right up to the stitching line.
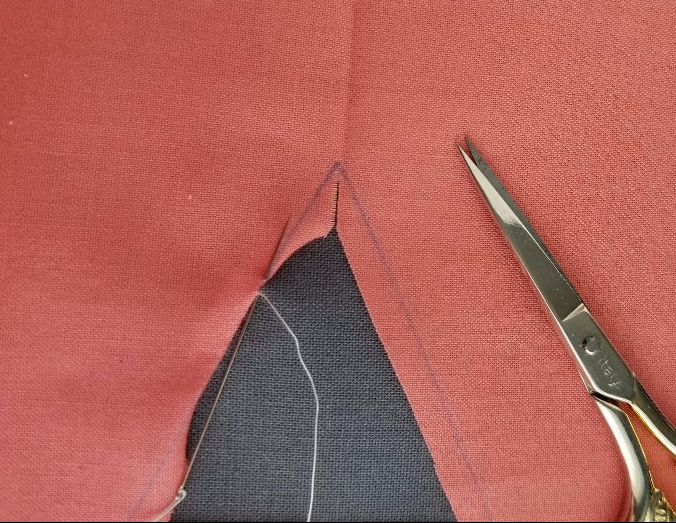
Tip: Try to avoid cutting at an angle. That causes one side of the seam allowance to be much narrower and therefore weaker in the finished quilt.
Continue stitching up to the corner point, using the same method we used for the deep “v” on the Loop block. (See the July post to review that information.) Continue working your way around each shape, always starting and ending in the center of a side, never in a corner.
Tip: Keep in mind that it’s okay for your stitches to show on these corners. Those spots that have been clipped need to be reinforced a bit. Just be thankful for matching thread and stitch the heck out of them.
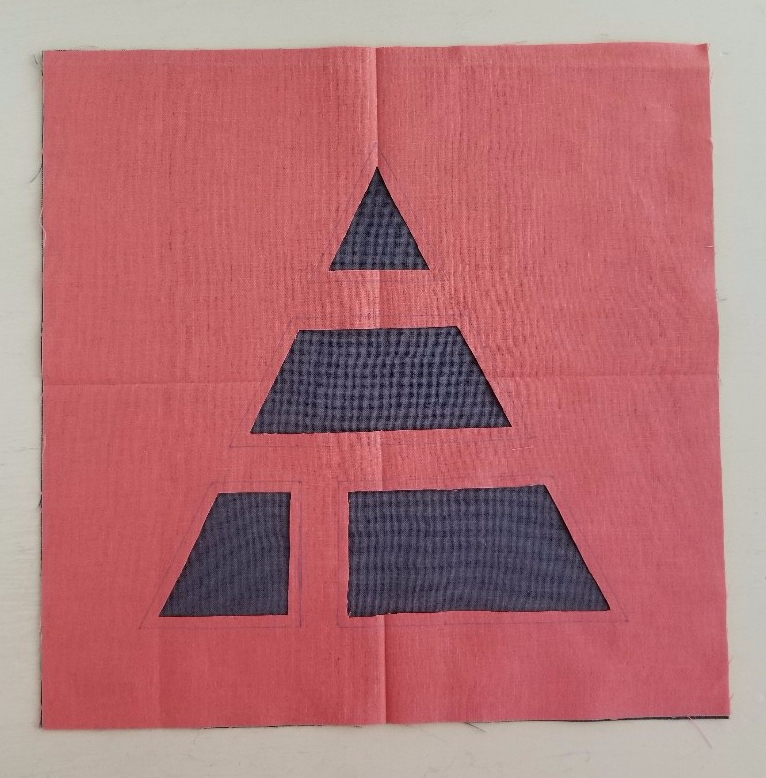
After you’ve completed all of the shapes (and possibly sworn at me a few times; again, I apologize) your finished block should look something like this:

It will go here in the final quilt layout (wall, then lap size):


As always, if you have any questions about anything here or would like more information, email me at thebespokeoutlaw@gmail.com or come find me on Instagram at @bespokeoutlaw.
Next month is our LAST appliqué block! And it’s my favorite one of all. (It is also blissfully corner-free.)
OCTOBER
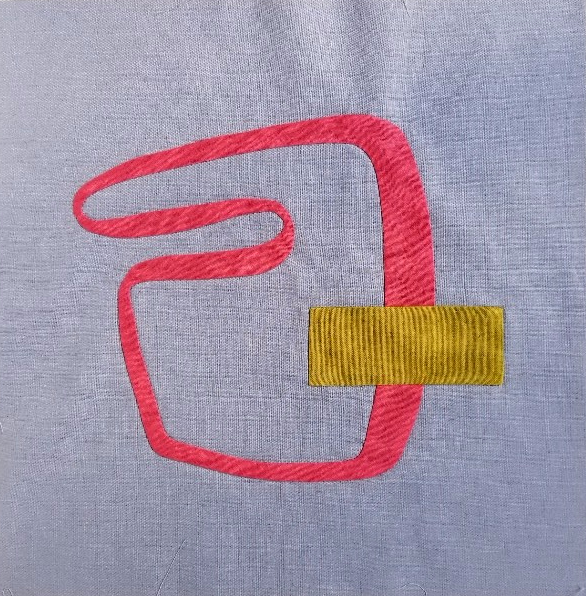
Minimal Day Sampler – Block Nine: Private Drive
Alright everyone, this is it. The LAST Minimal Day Sampler appliqué block. And of everything I designed in the process of working on this quilt, this is my very favorite bit. I hope you like it too.
The inspiration for this one takes us back to the beginning of this block of the month and my great uncle’s brooch. Back to that swanky housing development I told you about in May with the “Buildings” block. I find that place absolutely fascinating. (Probably because my weird imagination created it, and I love thinking about what might happen in a place like that, but whatever. Please just hang in here with me for a couple paragraphs and I promise we’ll get to the sewing.)
Within that particularly swanky little enclave, the design is sparse and deliberate. Restrained, yet full of texture and ideas and opinions. Sleek and artistic and interesting. Not an elastic waistband for miles. Ahem, anyway… This time, we’re on a very curvy private drive with an angular house off to the side. This house has the best parties. Not so much because they are particularly elaborate, but because the guests are so intriguing and the conversation lingers and lasts, turning and swelling like the curves of that drive.
And those curves, for stitching purposes, are no joke.
They are tight and back to back. We’re talking hairpin type curves here. BUT if you can manage these (and you can) then you can do circles too. Even tiny ones. Circles are the only skill I didn’t include in this sampler because they just felt forced everywhere I tried to put them. So I offer you instead, my most humble apologies for omitting them, as well as all the circle-making tips and tricks I know, upon request. Really. Just ask. I will happily show you any time.
Begin by printing out a copy of the template, making sure the scaling on your printer is turned off. The large cut-out template should be around 6 ¼” x 6 ½”.
Whether you are making the wall or lap sized quilt, this month’s block is the same for both.
Cutting:
- From background fabric: Cut one 10 ½” square
- From appliqué fabrics:
- Cut one rectangle 1 ¾” x 3 ¾” this includes seam allowances.
- Trace around and cut out one of the larger template shape, leaving your “fat eighth” inch seam allowance. DO NOT CUT OUT THE CENTER PORTION YET, but do make a small slit somewhere in the center so you’ll be able to more easily trim it away later. (You’ll notice in the example photos that I forgot to do this until much later. Save yourself the bother and do it now.)
Tip: Consider putting the template on the bias. I recently came across this technique and gave it a try for the first time on this block. It seems to really allow for more ease when turning under all these curved edges. Definitely helpful for any of the more complex appliqué shapes.
Lay out the appliqué pieces, layering the rectangle over the curved piece, as shown, so the whole thing is roughly centered.
Set the rectangle aside and baste the main appliqué in place.
Stitching:
Begin stitching on the straightest portion.
Stitch toward the first convex curve. When you begin to round that corner, be careful to turn under only enough seam allowance to take a SINGLE stitch each time. If you turn under too much or try to take too large of a stitch, the curve won’t be smooth. Take your time and move your stitches closer together as the curve gets sharper.
Tip: Remember that even though this is a dramatic curve, you should never need to clip on a convex curve. If the seam allowance won’t turn under smoothly or is causing the surface of the appliqué to be extremely lumpy, then the seam allowance is likely too wide. Try trimming off a tiny bit and see if that helps.
After you finish stitching the curve, continue to work your way toward the inner, concave curve. Stitch until the seam allowance starts to resist being turned under. Then clip a few spots (4 to 6) up to the drawn line to help it turn under smoothly.
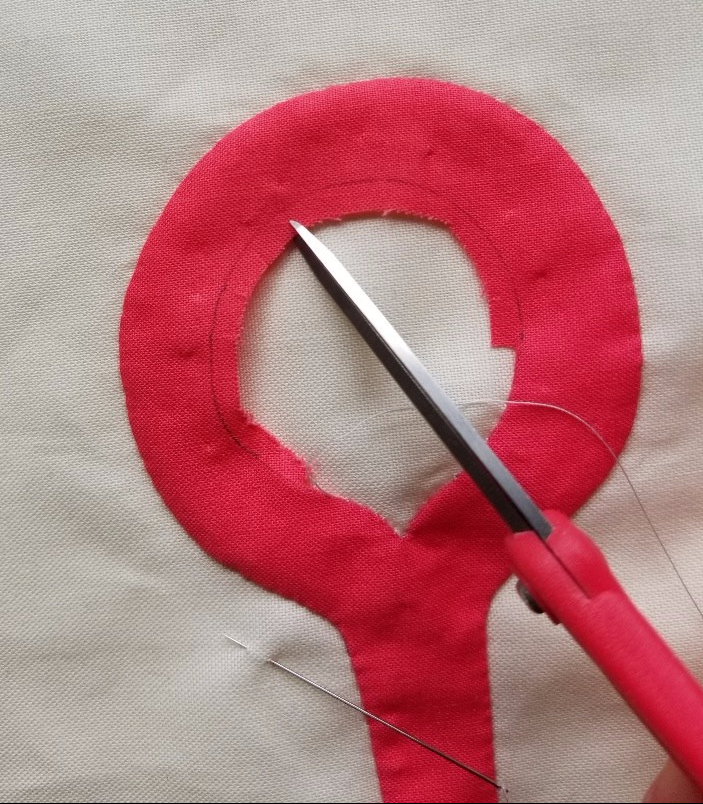
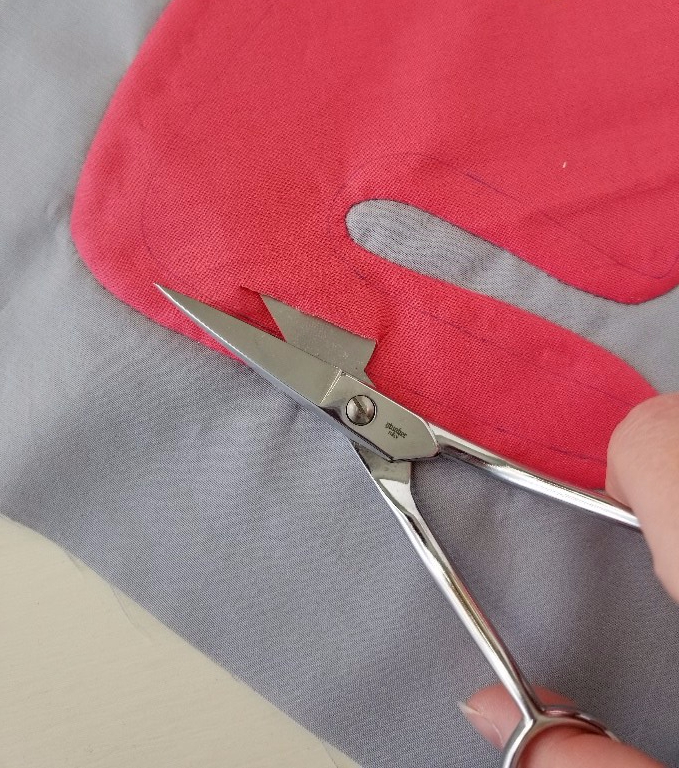
Continue stitching around the entire outside of the shape. Once you’ve finished, it’s time to cut out the interior portion. We didn’t cut this out earlier because the appliqué shape is very thin and would be rather floppy and easily distorted. It’s much more stable and easier to deal with if you wait to remove the inside until after the outside has been sewn down.
If you happen to have appliqué scissors (those funny, half swollen looking ones below) and like using them, go for it. (Though I had difficulty getting mine to fit in that thinner portion and switched to the Fiskars for that section.) If you don’t have appliqué scissors, they are certainly not necessary. Just use any pair you feel comfortable with. Starting from the slit we made at the beginning, and being sure to leave a seam allowance as you go, work your way SLOWLY around the inner shape, being very mindful not to accidentally cut through the background.

(In the photo above, you can see the slit I made for the first time. Yeah. Don’t wait until this stage. Trust me on this one, it’s panic-inducing.)
Tip: If you do have a pair of appliqué scissors but have never used them or aren’t sure how, there are plenty of videos that will show you the technique, but basically, the duckbill (rounded) side goes between the layers. It helps to prevent accidentally snipping through the background while you cut away the layer on top. (Cutting into the background at this stage, at least in my house, always results in swearing and sometimes even tears, if I’m being perfectly honest.)
Tip: If you do happen to snip into the background, consider adding another appliqué shape to cover it. No one will ever know it wasn’t meant to be there and I certainly won’t tell. It’s called “creative license”. Embrace it. It’s your friend. Invite it to all your parties. You’ll never regret it.
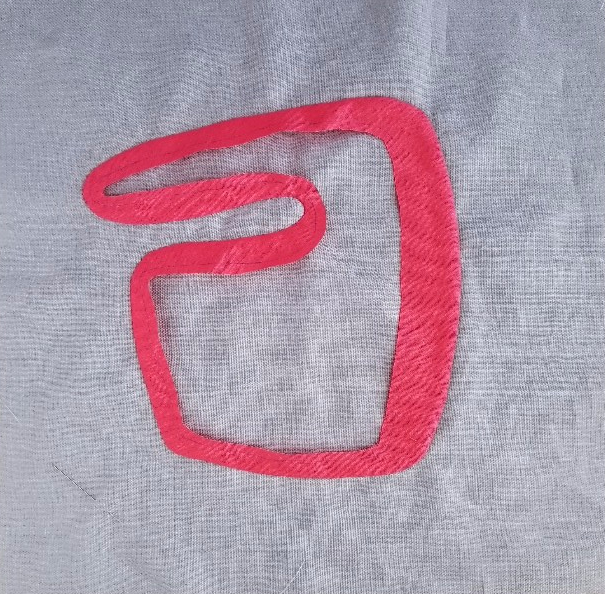
Again, starting on the straightest portion, stitch around the inside of the shape, taking your time with each of the curves, clipping the concave ones as you get to them.
Tip: A good rule of thumb is the sharper the curve, the more often you’ll need to clip. Keeping in mind that you still only want to clip as much as you absolutely have to, in order to help the fabric retain as much stability as possible.
Once you’ve stitched the whole appliqué down, place your rectangle appliqué so it straddles the right side of the first shape and the top edge is roughly at the half-way mark or slightly below.
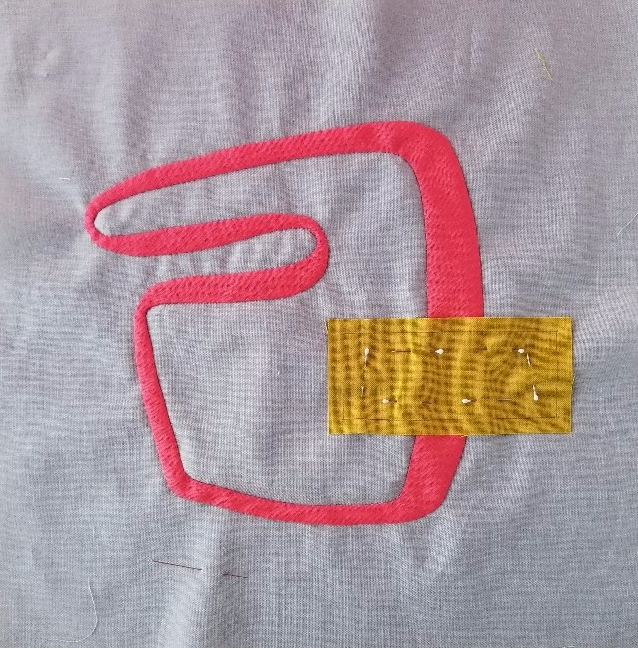
Baste and stitch down the rectangle. You can mark it ahead of time if you like. I did in this case, just to keep my edges as straight as possible.
Tip: Because it has only right angles, which don’t require clipping or much fiddling at all, you can finger press all of the edges under before you stitch if you choose.
Your finished block will look something like this:
It will go here in the final quilt layout (wall, then lap size):


As always, if you have any questions about anything here or would like more information, email me at thebespokeoutlaw@gmail.com or come find me on Instagram at @bespokeoutlaw.
Next month we will talk about filling in those last few holes and putting the top together. AND I will finally get to show you the original quilt! It’s been a loooong wait my friends, and I am really looking forward to it.
November
Minimal Day Sampler – Quilt Top Assembly
With all of the appliqué now complete, all that is left is to fill our last few holes, assemble some blocks, and sew the whole thing together. Since you had no idea where this project was headed when we set out all those months ago, this next section includes an opportunity or two to balance out color and/or print placement a bit if you feel you need to.
So we’ll get straight to it, shall we?
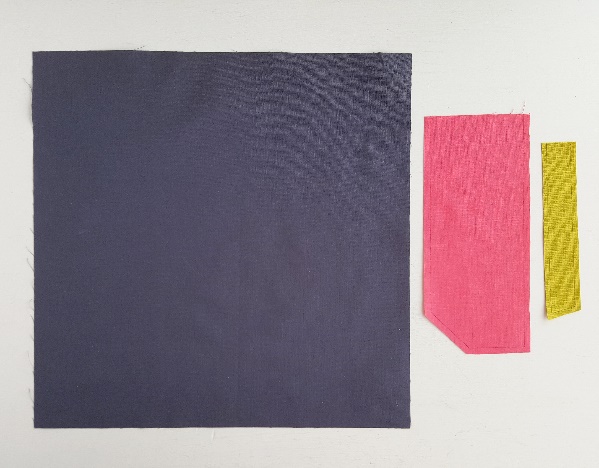
Cutting:
- From background fabric: Cut two 10 ½” x 5 ½” rectangles for the wall size, three for the lap size.

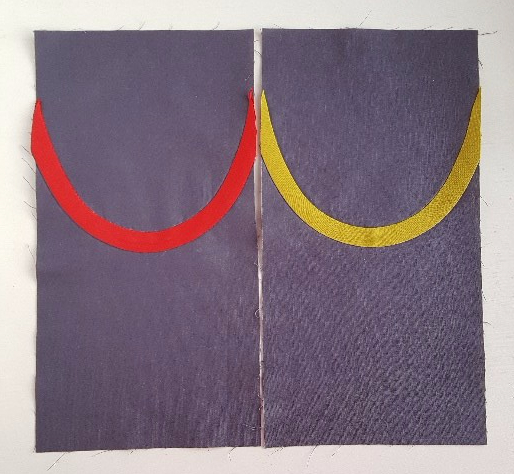
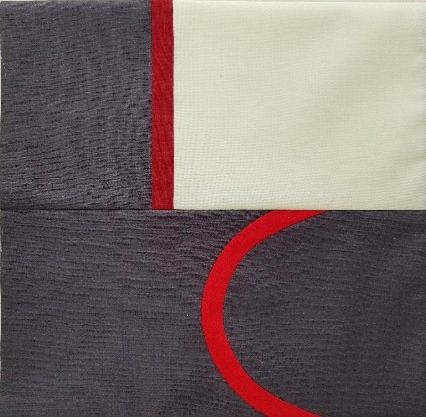
These pieces will go next to the Bias Curves blocks as shown in the layouts:


My working sample with the added pieces:
Now here’s your first chance to do some color balancing. Use these “blank” rectangle pieces to add a little simple improv piecing if you like. You can add more of a color that you feel is missing, or a focal point, or a little extra interest, or nothing at all. Whatever you think your quilt needs. You are the boss of this endeavor, remember?
On the sample, I wasn’t entirely happy with how my color placement ended up. It needed just the tiniest bit more of the dark red on the left side. But I didn’t want it to feel un-anchored just floating around in the white, so I decided to add more of the dark grey as well. That helped to connect it to the other half of the block.
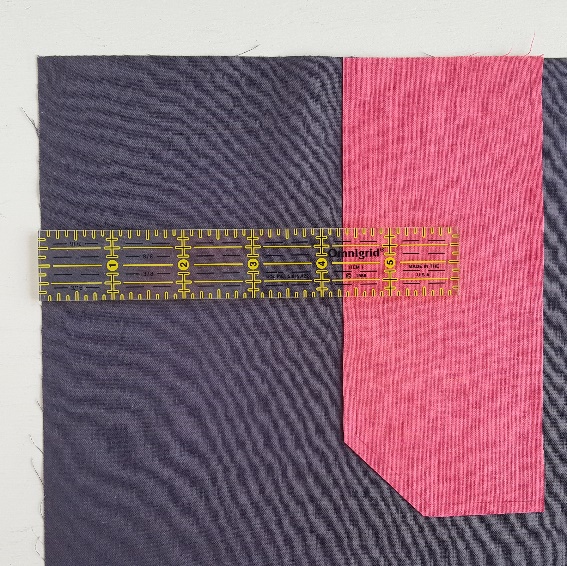
Once I was happy with it, I cut the rectangle down and added the pieces of the other colors, making sure the finished section still measured 10 ½” x 5 ½”.
Tip: For this step and everything else going forward, use a standard ¼” seam allowance and press to whichever direction makes you happiest.
Sew your new rectangle pieces to the Bias Curves, paying attention to the orientation and placement of the appliqués in relation to the rest of the block.
Next, sew your Quarter Opals and Reverse Quarter Opals blocks together as shown in the layouts above.
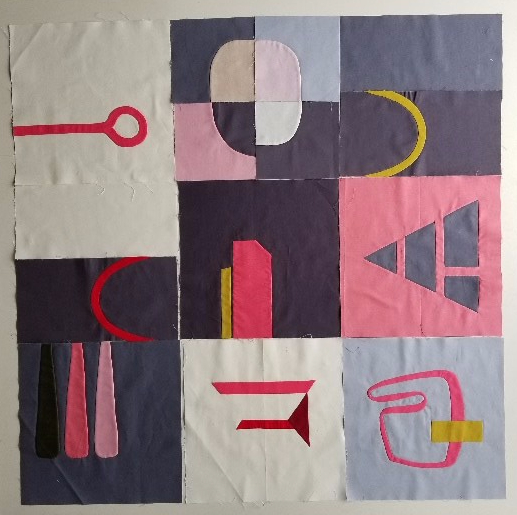
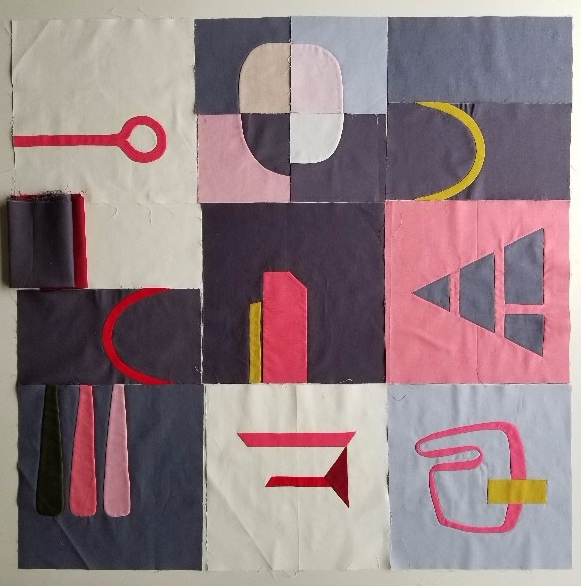
Now you should have nine (or twelve for the lap size) finished 10 ½” square blocks. If you are making the wall size, you can sew them together as shown (or feel free to rearrange them as you see fit, Boss).
If you are making the lap size, we’ll move on to the sashing and borders.
Cutting for Borders and Sashing:
- From 2 ¼ yds of background fabric
- Sashing – Cut six 3 ½” x WOF strips
- Sub-cut three of those to 3 ½” x 36 ½”
- Sub-cut the remaining three strips to eight pieces that are 3 ½” x 10 ½”
- Borders – (cut along length of fabric)
- Cut two pieces 49 ½” x 10”
- Cut two pieces 55 ½” x 10”
- Sashing – Cut six 3 ½” x WOF strips
Tip: If your fabric isn’t wide enough to yield all four 10” strips across the width, you can just cut them a bit narrower instead. Or piece something else in. Or cut one from a different fabric. Use it as an opportunity to call in your old friend “creative license”. It’s probably still hanging around from your last party anyway, right?
At this point, you can go straight to sewing the top together, OR you can lay it out with the sashing pieces and borders and assess the color placement again, like we did above with the “blank” rectangles. Feel free to piece in an accent or two (or twenty) until it feels right to you. Or leave it entirely as-is. On the original sample, I chose to leave the sashing and borders alone, because I wanted to be able to blend them into the background with the quilting, leaving the focus on the appliqué.
Sew the short sashing pieces vertically between the blocks, creating rows.
Use the long sashing pieces horizontally to join the rows.
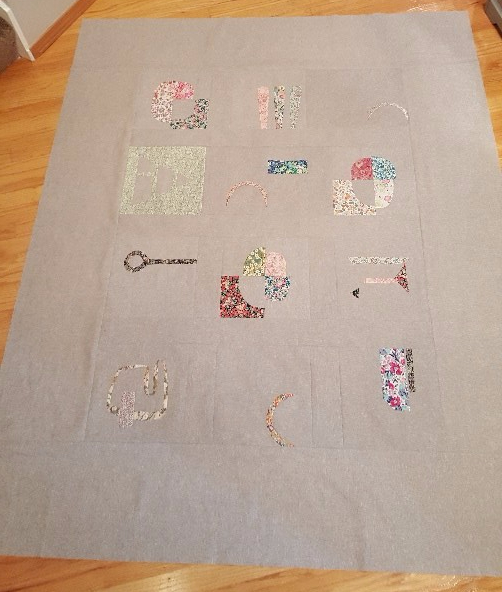
(Please excuse the following horrible-on-the-floor-bad-angle-nighttime-lighting-utterly-dreadful-photos. They are from about a year ago and I hadn’t thought ahead far enough to plan out nicer ones.)
Once the center panel is complete, add the 49 ½” borders to the sides. Then sew the 55 ½” borders to the top and bottom. It should look something like this:
As always, if you have any questions about anything here or would like more information, email me at thebespokeoutlaw@gmail.com or come find me on Instagram at @bespokeoutlaw.
Next month we’ll talk about quilting plans and finishing up this year long labor of love.
December
Minimal Day Sampler – Finishing Your Quilt!
Alright everyone, it’s here.
The big finish.
We’ve been working toward this for a year now and I have rather mixed feelings about the end of this BOM. I’m really going to miss our (admittedly one-sided) chats each month. But at the same time, I am SO EXCITED to see your quilts coming together! So many of you have jumped in on this appliqué adventure with me and it has been an absolute joy seeing your incredible work and interpretation of these blocks each month. Thank you for that.
Last time we assembled our tops, so this month I’ll tell you about how I chose to back, quilt, bind and label the original sample. This is most assuredly not a set of instructions. It is merely my process. I’m offering it solely in hopes that you might use it as a spring board for your own ideas. Or if you’re desperately bored, something to read for a few minutes.
The Back
Some people are dedicated one-fabric quilt backers. Which can be especially fun if you go to the effort of pattern-matching. Others like to cobble a back together with whatever they have hanging around. This is me. I tend to buy small pieces of fabrics, rather than larger yardage cuts, so I rarely have anything that will cover more than a mug-rug. Plus, I feel like once I get to the back, the pressure is off and I can just play with any old random arrangement that will make the most of what I have.
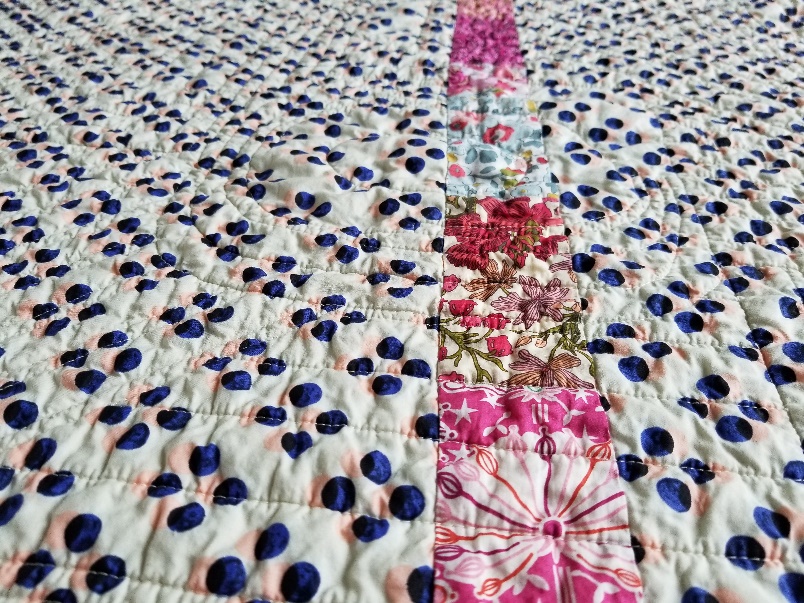
However, since all the appliqué for this quilt was done in Liberty, I wanted to back it with a yummy lawn. Of course, I didn’t have remotely enough. So I shopped around and picked up actual yardage (what?!) of a fun, dotty Cotton and Steel lawn. It still had to be seamed together though, so I took the opportunity to add in a strip of Liberty scraps for a bit of fun. (Also, I like to use all the fabrics. Like, pretty much always.)
The Quilting
I am Not a Quilter. I dread the quilting bit. It scares the bejesus out of me and makes me swear a lot. Like a sailor. Or a trucker. Or my dad when he puts the lights on the Christmas tree. A lot of swearing. So this part stressed me out. But I did spend quite a bit of time thinking about it as I was sewing the top. Slow hand stitching is reeeeally good for thinking. So by the time I got to this point, I had given myself all the pep-talks and was ready to face it. Mostly. Gulp.
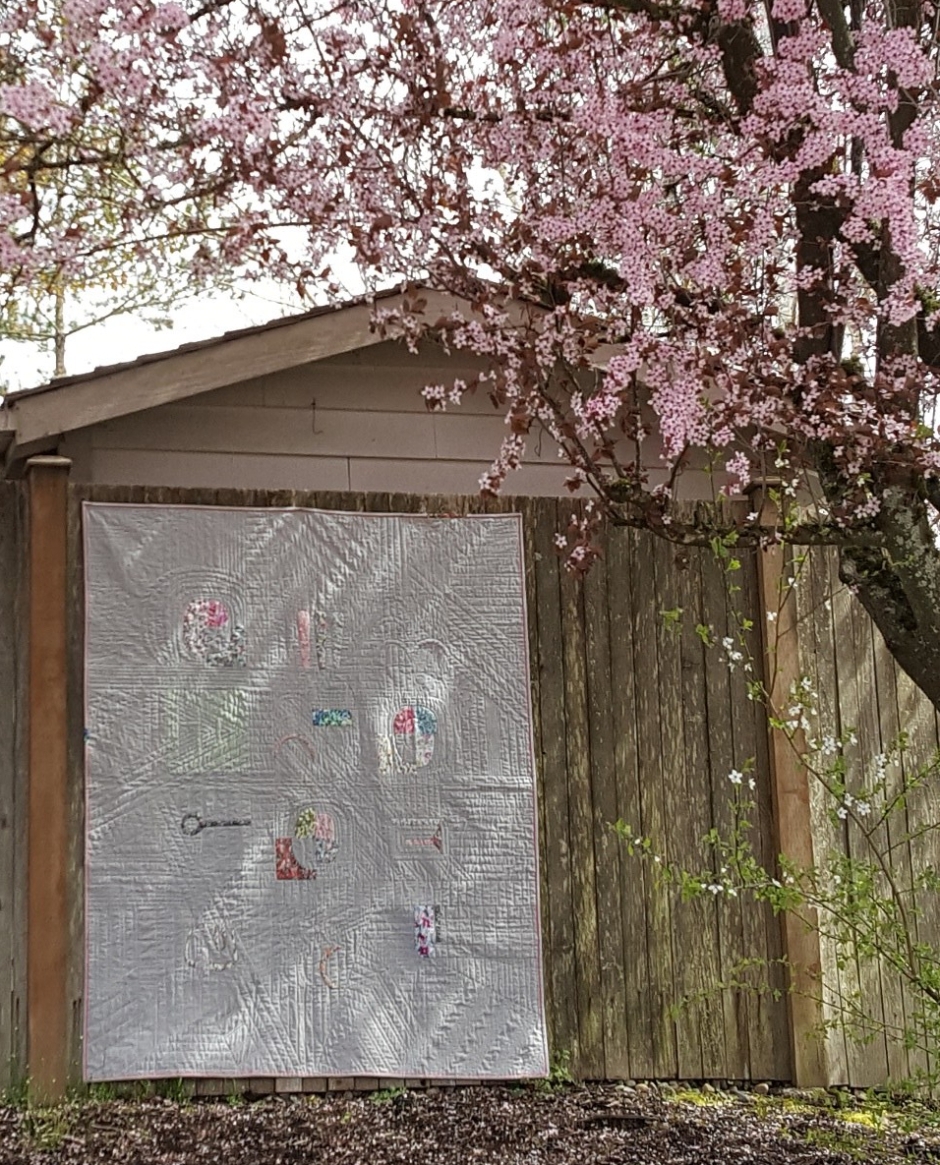
When I originally pieced the sashing and borders into my quilt top, I knew I wanted to quilt it in a way that would minimize them as much as possible. My ultimate goal was to “erase” the setting pieces so the appliqué would just appear to float without looking quite so squarely framed. I also wanted to repeat some of the appliqué motifs within the quilting.
So I made a few printed copies of the layout and drew all over them again and again until I had a plan I was happy with. (You can print out copies for yourself of either the lap or wall size versions if you want to give it a go too.) The appliqué shapes I wanted to repeat were drawn on first, then I used a mix of straight lines in varying patterns and a few grids to fill in the rest of the space.
Then using that plan as a guide, I drew each line on the quilt top with my trusty blue pen. Since I am Not a Quilter, this was a necessary step for me. You probably don’t need to go to such extremes, but I was still tip-toeing around the edge of a major quilting induced freak-out, so I wasn’t taking any chances. Marking every line took absolutely FOREVER (or at least it felt that way), but it was worth it in the end.
Tip: The pen I use is the blue ink, water erasable fabric marker by Sewline, UPC 4989783070331. I love this pen. The only time I have had an issue with it not entirely erasing from fabric with a bit of water was when I had used a ton of starch and it didn’t come out until it had been through the laundry. But it did come out. I LOVE this pen.
Once everything was layered up and basted, I chose a quilting thread to match the grey background of the top and an off white for the bobbin. It needed to blend in as much as possible to help hide the potentially janky stitches. Not a Quilter, remember?
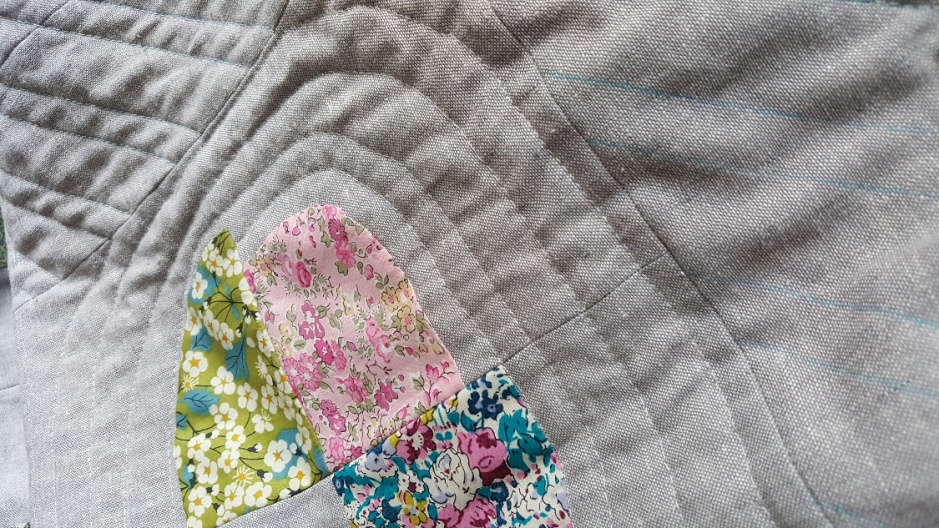
After all that preparation and worry, I finally dug in and started quilting. It was very slow going. However, for the first time in my entire quilty life, I completely surprised myself when I realized that I was kind of excited about that step in the process. (Who am I?!) The texture I was starting to see was so dreamy and I started to actually relax as I moved from section to section. As I neared the end, I was practically giddy to finish it. It was like a Christmas miracle. Only in February. Which totally counts.
The Binding
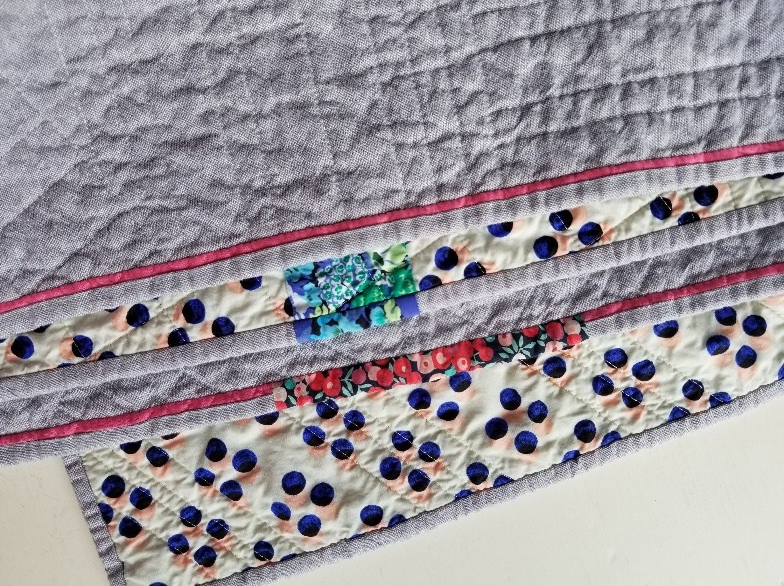
With the unexpectedly pleasant quilting out of the way, it was time to do the binding. For years I have been meaning to try a flanged binding, but not being a Quilter, I rarely had much to bind. Funny how that works, huh? Anyway, I wanted to add a pop of color to the top so I used a bubble-gum pink for the flange and more of the background grey for the binding. It was surprisingly easy to do and I love the extra bit of color that helps break up that sea of grey.
Tip: If you search for “faux piped binding” or “flanged binding” online, there are lots of tutorials if you’d like to try it too. It’s typically machine finished, so it’s a nice option if you don’t enjoy hand stitching a binding.
At the last minute, I also spliced a couple pieces of Liberty into the binding too, because I cannot leave well enough alone. (Also, use all the fabrics.) It’s a nice way to add in a bit of an accent if you like that sort of thing. And I really love how the blue section wraps around from the strip I pieced into the backing.
The Label
Coming from generations of non-quilters, there is only one quilt in my family and it isn’t labeled. It is appliquéd, embroidered, hand quilted and at least twin-sized. A family friend made it for my father when he was born in 1934. I don’t know any more about it and I’m not sure he does either. I find that terribly sad; so much time, effort, and love went into making it.
It may seem like once you’ve hit the binding point, you are so ready to be on to the next project that a label is the least of your concerns. But I really wish that quiltmaker had taken the time to add that one last detail so we would at least know her name. Besides, after you spend all that time, effort, blood, sweat, tears, money, and energy on making a quilt, you ABSOLUTELY deserve to get all the credit for it.
Put your name on your quilt.
Write it on there with a Sharpie, like a celebrity autograph if you want. Embroider a fancy label. Have little nametags made. Piece it into the back. Whatever. Put. Your. Name. On. Your. Quilt. You have sooooo earned it.
For this one, I typed up my info and printed it on a piece of pre-treated Kona that I ran through my printer.

Tip: I used Bubble Jet Set 2000, because I happened to have some (you can find it on Amazon). It’s very easy to use and works well. You can also buy pre-treated fabric sheets that are all prepped to run through your printer without dealing with any chemicals or mess yourself.
I appliquéd the printed fabric on the back next to the pieced strip, along with a few of the same shapes from the front. It didn’t take long to do, but it did give me a chance to put a bit more of myself into this piece of art that has become very meaningful to me. It’s a quilt about art, about family, about fellowship. And in 80 years when someone else comes across it, they will know who inspired it, who made it, and why. And that gives me a wonderful sense of completion.
Now it’s your turn.
Please tag me on Instagram (@bespokeoutlaw) or email me (thebespokeoutlaw@gmail.com) or come find me at a guild meeting so I can see your finished quilt. I have seen a few so far and they are just amazing. I cannot wait to see more!
To those of you who sewed along, commented on the posts, or took the time to tell me how much you enjoyed reading these, I cannot begin to tell you how much it has meant to me. Thank you.
Happy appliqué-ing!
Jonna
